

Anil Kumar KP


Anil Kumar KP
Blogs

Search London Celebrates its 8th Birthday in Bounce, Central London
Search London, also known as SearchLDN was officially set up in October 2010 when I took over the meetup group from my former colleague. There were 200 members and just 2 meetups. It was rebranded to Search London and there are now more than 2200 members and there have been over 50 meetups
To celebrate turning 8 years old, SearchLDN had their party at Bounce, in Central London François Goube, founder of OnCrawl spoke about “How to Make Better SEO Decisions” and Lukasz Zelezny presented “SEO Tactics To Implement Tonight”. Yard, a technical agency with offices in Cardiff and Edinburgh sponsored the cakes, what is a birthday party without the cake?
How to Make Better SEO Decisions
The headline Sponsor of the night was OnCrawl and the CEO and founder, François shared a user case about how to use data to build a better SEO roadmap. He loves to run test with data,which is why he built Oncrawl. In his presentation, Francois wanted to help us (those in SEO) be the super hero. He shared 5 tips on how to make better SEO decisions.
1) Log file analysis
Log file analysis is important, because SEOs can see in real time what Google is doing. Those in online marketing can see how often Google is coming to a website, the new pages that are crawled every day.
Showing examples in the presentation (which you can see in the video below), Francois showed how Google bots behave when they are rendering javascript. When users review your log files, it helps you to see how Google is rendering your resources.
SEOs can also understand when Google is switching you to the mobile index.
As soon as you are mapping your website, it is easy to see the log file analysis and see that Google may not be looking at all of a website.
2) Combing log files with crawls
When combining crawl and log data, users are crunching both data sets which allows SEOs to see what franking factor influences ranking factor.
François then shared an example from his case stud there a page has 800 words, Google crawled 8 out of 10 of the pages. A page with less than 500 words, Google crawled 1 out of 2 of your pages.
“It is not about adding content and unique content, the real question is how many pages do I need for each page to get them crawled.”
3) Loading time
Google does not behave the same for all websites.
For classified sites, the volume of content is not important. Google knows it is hard to build unique content for these types of site, therefore it does not penalize these sites if they do not have lots of unique content.
4) Links
How many links should you build to add to pages to get them crawled? Francois said analyzing logs and crawl can help SEOs.
5) H1
Is it important to have a unique H1. According to Francois’ data, the sites had had unique H1s, Google crawled 70% of the site. When there is no unique H1, Google crawled 30% of the site.
Understand the behavior of your users, combine your crawl data with log file analysis. With OnCrawl you can also add your Google Search Console Data and you can therefore analyse the data after.
The full video can be found on YouTube
SEO Tactics to Implement Tonight
Lukasz Zelezny is a regular at Search London and now as a freelance consultant, this was the first time for him to sponsor the SearchLDN event. Lukasz was the gold sponsor on the night and he shared some great SEO tactics to implement that night.
1) Tactic – finding low hanging fruits with Search Console
Google Search Console is a very powerful tool, but there are some limitations. For example, there is a limit on the number of rows to export (999 keywords). Plug Search Console into Google Data Studio allowing you to give a broader view of the data including more keywords. You can export this and start optimizing for existing keywords. You can also see where a site is ranking and how to rank it higher.
2) On Page Optimisation:
Lukasz is an avid user of SEMrush. He likes to work with them because it provides many different pieces of information about your website. SEMrush is also easy to present data, you can show your client what work you are carrying out.
3) Merge subdomains into Subfolders
Lukasz talked about a client that wanted to move his blog from the subdomain into a subfolder. For example, moving blog.domain.com to domain.com/blog. This had a positive impact on the client’s site. This is because Lukasz was merging two domains into one and as a result they say the traffic and visibility increase.
4) Link building with Brand
Use a social monitoring tool to track your brand. Lukasz recommended Brand24. You can then see where the mentions are and if there is any misspellings or old data, you can ask them to correct them and link to your site.
5) Cloud
Lukasz recommended using siteground and WPEngine. The basic package for Siteground was 9 GBP.
Lukasz’s presentation was also recorded and can be found here:
After the presentations, there were two cakes to cut, with the cake sponsor Yard helping blow out the candles. The agency sponsored two cakes for the event, a delicious chocolate one and a cookies and cream cake for Search LDN.
The rest of the evening was taken up by ping pong games. There were two “games gurus” who organized the rest of the attendees into ping pong competitions.
There was also food and drinks at the event. With 85 people attending on a Monday, it was a busy night. This meetup group has grown over the past 8 years because of great speakers and of the people that attend. Anyone can start a meetup group but consistency, patience with relevant topics and good speakers allows the meetup to grow and become a community.
I would like to say a big thank you to everyone who has been part of SearchLDN for the past 8 years. Last year after we turned 7, I asked Ayruz to build our site, they were professional and helped a lot after the site had been built. Thank you also to the photographer Mariusz (from http://Grafimar.co.uk) who Lukasz invited to capture the evening.


See more images

Jo Juliana Turnbull is a skilled professional in SEO and online marketing with over 10 years of experience in digital (both client and agency side). She set up her website SEO Jo Blogs in 2009 after she started a career in SEO. She is also a travel blogger and shares her budget travel tips on Being30.com. SEO Jo is the organizer of a networking group called Search London for online professionals in SEO, PPC and Social Media. She has been running the event for over 8 years where it has grown to over 2200 members.

CCPA Data Privacy Regulations For Residents Of California
What is CCPA?
California Consumers Protection Act 2018 (Also referred to as CCPA) is a data protection act which is designed to protect the data privacy rights of the citizens residing in the state of California. It will allow consumers to force companies to tell them what personal information they have collected, which means it gives more control to consumers. It also lets consumers force companies to delete that data or to prevent them from sharing it with third parties.
When CCPA goes into effect?
California Consumer Privacy Act (CCPA) will have a significant global impact like the General Data Protection Regulation (GDPR). This California state law that was passed in June 2018; however, it doesn’t go into effect until January 1, 2020. The scope of its enforcement is for the Attorney General of California to specify no later than July 2020.
Who Does this affect?
Primarily, CCPA applies to three types of companies, such as :
- All companies in the world that serves California residents and have at least $25 million in annual revenue.
- Those companies which obtain personal information of at least 50,000 California residents, households, and /or devices per year.
- Companies of any size, who don’t have to be based in California or have a physical presence there to fall under the law; however, are related to California in one way or another, in terms of a regional office, customers.
What is important in CCPA?
When the CCPA goes into effect, consumers will gain additional rights concerning their personal information that companies gather about them like their name, address, location, websites frequented, etc. In particular, the consumer will be allowed to:
- Know what personal information companies are collecting about them.
- Say no to the sale of their personal information.
- Access their personal information that is collected.
Companies are required to provide equal service and pricing to customers who exercise their privacy rights. This is to ensure that companies do not treat customers differently through raising prices or discriminating in services provided if they ask about their personal information.
What are the penalties for non-compliance?
The CCPA is enforced primarily by the California attorney general, who may seek civil penalties of up to $2,500 per violation or up to $7,500 per intentional violation. The law, however, also provides a private right of action for certain data breaches arising from violations of California’s data security law. Affected California residents can seek $100 to $750 in statutory damages per individual per incident or actual damages, whichever is higher.
What happens if your company is not in compliance with the CCPA?
Companies have 30 days to conform with the law once regulators inform them of a violation. If the issue isn’t fixed, there’s a penalty of up to $7,500 per record.
Is CCPA the same as GDPR?
Both laws give individual rights to access and delete their personal information, require transparency about information use and necessitate contracts between businesses and their service providers. However, the CCPA covers fewer businesses and affords broader rights to a more limited class of individuals than the GDPR. While both the CCPA and GDPR require detailed privacy notices, the required content of those notices differs. A privacy policy that meets the requirements of the GDPR will likely not satisfy the CCPA’s requirements. The CCPA requires different privacy policy disclosures compared to the GDPR, including data sales using a broad definition of “sale.”
What is Facebook Conversion API (Facebook CAPI) Server-Side Tag?
As you are aware, after the Apple iOS 14.5 update which was rolled out with option for the users to opt out of tracking, your Facebook Pixel is unable to collect user data like it could previously.
This has made the size of your custom audience, lookalike audiences to shrink. Again, when you look at the reporting side for your Facebook campaigns, you can see underreporting on conversions, events, ROAS, etc. The Facebook report data became unreliable to make informed decisions.
Facebook, with the help of Facebook Conversion API (CAPI) helps you fix some of the data loss issues associated with iOS 14.5 update.
To use Facebook Conversion API via Google Tag Manager, you need to have server-side tagging in place for your website.
You can download our free white-paper that talks all about the death of third-party cookies by 2023 and the importance of server-side tracking here.
Facebook Conversion API server-side tag enables you to seamlessly send the event data to the Facebook Conversion API from a server-side environment that you have created using Google Tag Manager Server-Side Tagging.
Server-Side Tagging in GTM: A Quick Overview
Server-side Tagging in GTM enables you to move your data collection mechanisms from your website into a server container in your Google Cloud account. This allows you to minimize the use of javascript libraries. Also, using Server-side Tagging in GTM could potentially mean having more security for your customer data.
Inside the Google Tag Manager server and web containers, you will need to set up server-side tracking for Analytics (Universal or GA4) and configure events for those actions that you want to track with Facebook conversion API.
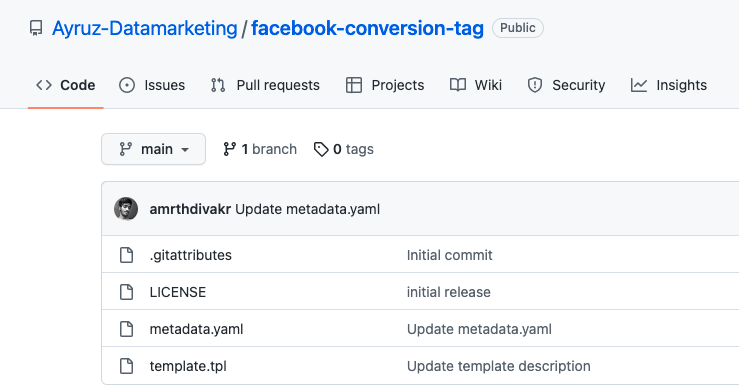
For Facebook Conversions API, the server-side tag can be added from the Github Repositories tab, you do not need to create the tags from scratch, our developers have already created ready-to-use Facebook Conversions API server-side tag for you.
How to Set Up the Conversions API for Website
The steps you can follow to use Facebook Conversions API Server-Side Tag
1. Download template.tpl to your desktop
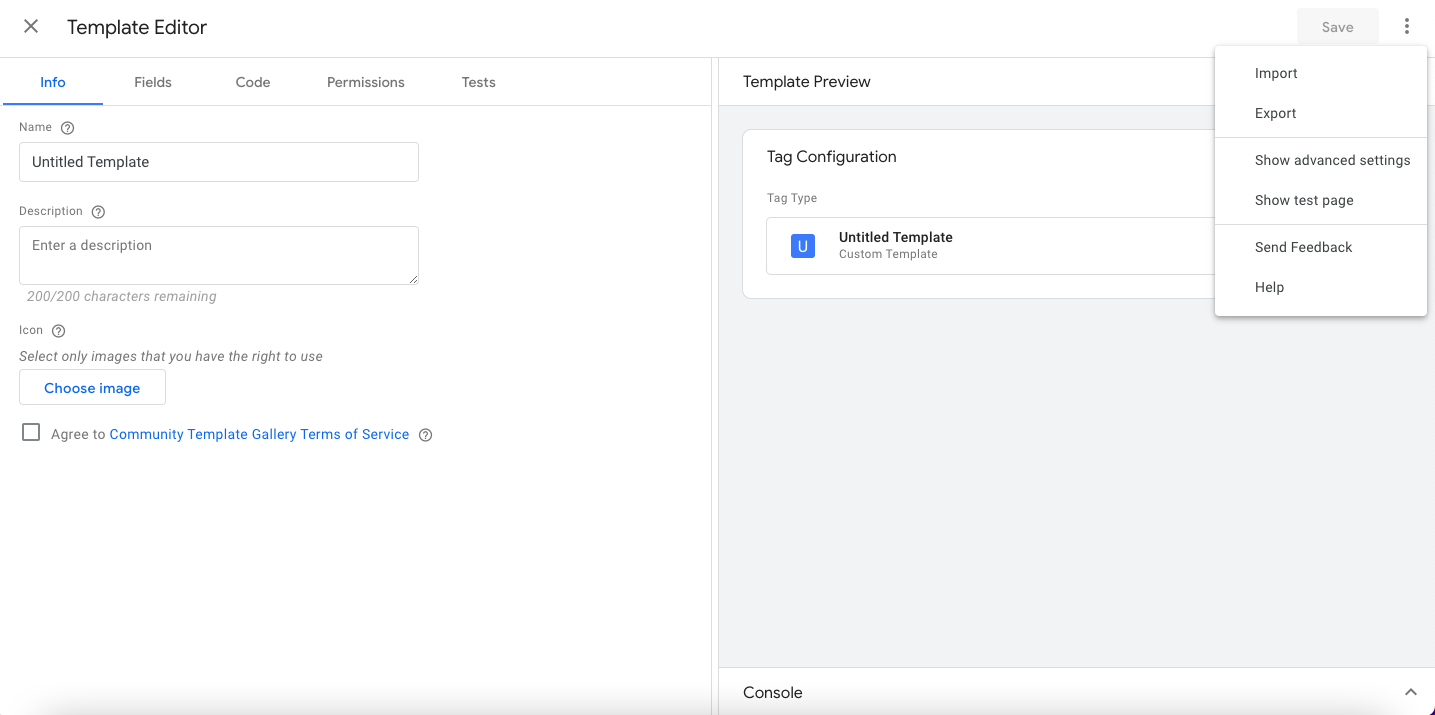
2. From the template tab on the left side of GTM server-side Click → New → 3 Dots on the Right Side → Click Import→ Select and add Downloaded template file for Facebook Conversion API → Click Save
3. There are below variables that you need to update in the next few steps for Facebook Conversion
API server-side tag
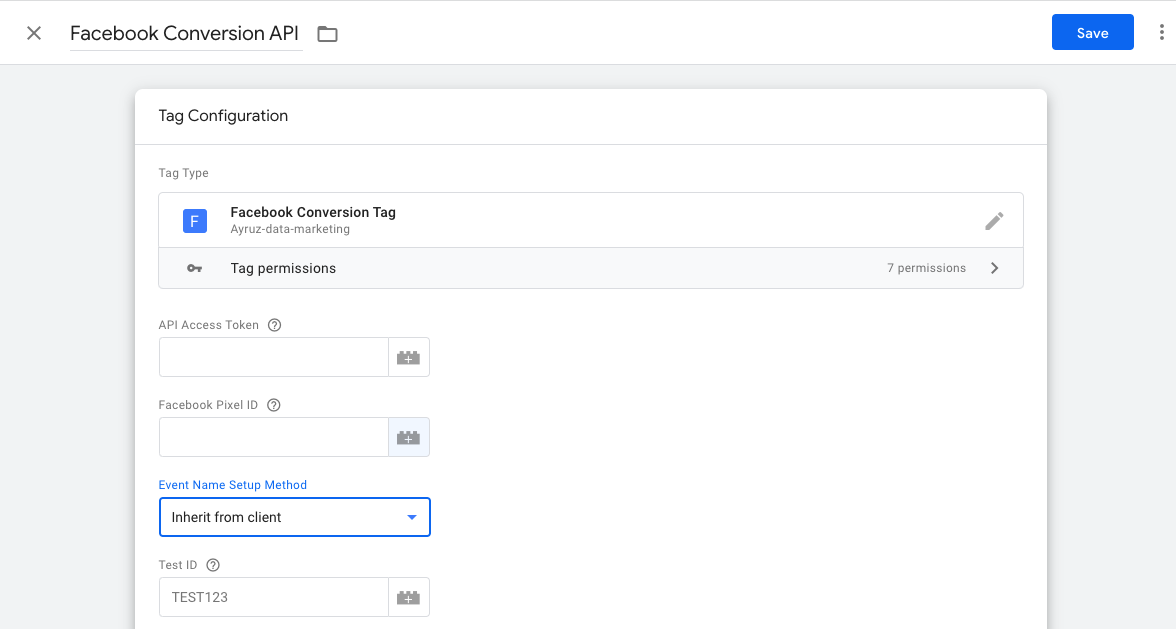
- Facebook pixel ID
- Facebook API Access Token
- Test ID (Optional)
4.Add your Facebook pixel ID and Facebook API Access Token as a variable which you would need to track Facebook Events. You can get your Facebook Pixel ID by going to the Overview tab Inside of Facebook Business Manager.
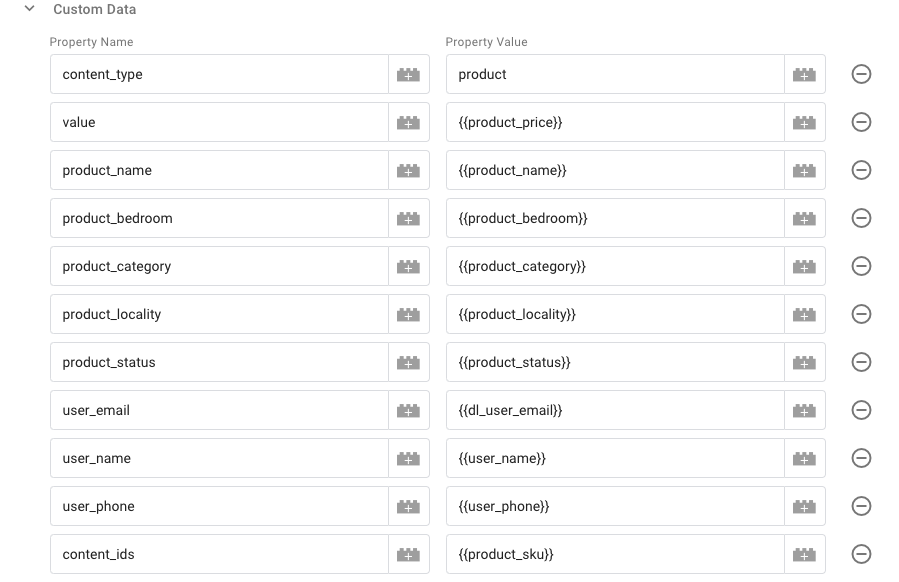
Server-Side Event Data Parameters
- You can configure general data parameters that you want to send to Facebook for eg: Event ID, Event Time, Page URL, Action Source like website etc.
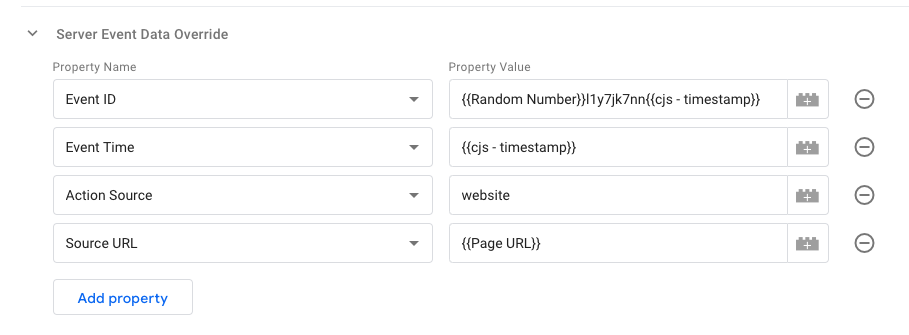
2.Along with general parameters, you can also pass the values of custom data parameters like product name, currency, and other E-commerce values.
- Add trigger to Facebook Conversion API Server-Side Tag : Configure Trigger for Facebook Conversion API tag for all events or custom events by clicking triggers in server-side GTM.

We recommend the following conversion events at a minimum like an Email, Signup, Add to cart, Purchases, and Product View to ensure you have accurate data across all of your conversion metrics.
Go to your website and perform any events such as Purchase, Add to Cart, etc.. you will be able to see the Facebook Conversion API has worked successfully.

How to Identify and Resolve Duplicate Events in Google Analytics 4 (GA4)?
The newest version of Google’s analytics platform is called Google Analytics 4 (GA4). It offers a new approach to measuring user behaviour and engagement on your website or app. GA4 has an important aspect called event tracking. This enables you to track user actions, such as clicks, form submissions, and video views. However, sometimes events may be recorded multiple times, leading to the problem of duplicate events.
In this article, we’ll explore the causes of duplicate events in GA4, how to debug to view duplicate events, and the solutions to fix the issue.
What is an Event in GA4?
In Google Analytics 4, an event is a user action that is tracked on a website or app. These actions may include clicking buttons, submitting forms, playing videos, and downloading files. Event parameters in GA4 are additional details that are sent with an event.
Causes of Duplicate Events
There are several reasons why duplicate events may occur in GA4. Here are some of the most common causes:
- Implementation Errors: The most common cause of duplicate events is an error in event tracking implementation. This can happen if the same event is triggered multiple times on the same page or if events are not properly scoped to individual elements on the page.
- GTM Configuration Issues: If you’re using Google Tag Manager (GTM) to implement GA4 event tracking, configuration issues can cause duplicate events. For example, If you have several tags that trigger the same event or a tag that triggers various triggers.
Debugging Duplicate Events
Debugging duplicate events in GA4 can be challenging, but several tools and techniques can help.
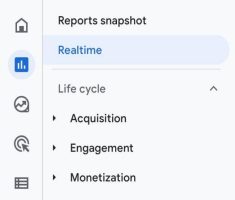
- Real-Time Reporting: The real-time reporting feature in GA4 can be useful for identifying duplicate events. You can use this feature to see events on your website or app and check whether they are being recorded multiple times and lets you see how users behave when it enters the conversion funnel. The real-time data in GA4 is only available for the last 30 minutes, so it’s important to use this feature to monitor short-term trends rather than long-term performance. To access real-time data in GA4, you can navigate to the Realtime section and click Reports > Realtime in the left-hand menu of your GA4 property.
- Event Debugging Tools: GA4 offers several debugging tools that can help you troubleshoot issues with event tracking. For example, the DebugView tool allows you to see the data that is being sent to GA4 in real-time, and can help you identify issues with implementation.
- Chrome DevTools: The Chrome DevTools can also be useful for debugging GA4 event tracking. You can use the network tab to see the requests that are being sent to GA4, and check whether events are being recorded multiple times.
Solutions for Duplicate Events
Once you have identified the cause of the duplicate events, there are several solutions that you can implement to fix the issue.
1. Remove Duplicate tracking in Google Analytics 4 and Google Tag Manager.
If you’re using GTM to implement GA4 event tracking, checking if the GA4 tracking code is hardcoded and if the same events are being tracked twice is important. This can happen if the hardcoded GA4 tracking code also sends the same events to GA4 as the events tracked through GTM. Checking the website’s source code is one way to identify hard coded GA4. For example, if a visitor starts a checkout, identical events will be sent to GA4, one from GTM and one from GA4, resulting in duplicates.
2. Duplicate DataLayer events
When the same event is pushed to the DataLayer multiple times, it can lead to duplicate DataLayer events and ultimately cause duplicate events to be sent to Google Analytics 4 (GA4). To address this issue, here are some potential solutions:
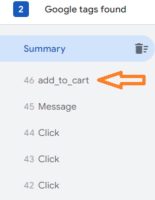
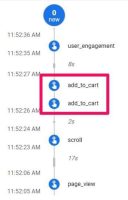
For example, suppose you’re seeing duplicate “add_to_cart” events in your GA4 Debug View. In that case, it means that the events are sent when a visitor clicks the “Add To Cart” button and a “DataLayer.push” is triggered, making the click information visible in preview mode.Ensure that events are not being pushed multiple times to the DataLayer on the same page. Examine your website’s code to identify any instances where the same event is being pushed more than once.
3. Created Events in GA4 and later moving to GTM
If events are created directly in GA4, and there are concerns of duplicate events, it is recommended to migrate the events to Google Tag Manager (GTM). Here are the steps to do so:
- Create the necessary tags, triggers, and variables in GTM to replicate the GA4 events.
- Update the website or application’s code to remove the GA4 event tracking code.
- Implement the GTM container code on the website or application.
- Test the new GTM implementation to ensure the events are being tracked correctly and there are no duplicate events.
- After ensuring everything is functioning properly, removing the GA4 event tracking code is recommended.
It is important to note that migrating events from GA4 to GTM can be time-consuming and should be done carefully to ensure all events are accurately replicated in GTM. It is also important to clearly understand the events being tracked and their impact on the overall data analysis before making any changes.
4. The same container is added multiple times to the website.
Including the Google Tag Manager (GTM) container more than once on a website can result in various issues, including multiple firing of duplicated tags, inaccurate data collection, and increased page loading times. To prevent issues, it’s important to confirm that the GTM container code wasn’t accidentally added more than once through manual insertion on the website. By examining the website’s code, any occurrences of duplicated GTM container code can be identified.
Conclusion
With the help of GA4 agency, you can identify and fix duplicate events in GA4 using real-time tools and techniques.

Are you experiencing issues with the automatic migration of GA4? Let’s discuss alternatives!
As of July 1, 2023, Universal Analytics (UA) properties will no longer process new hits. This is because Google is phasing out UA and replacing it with their newer measurement solution, Google Analytics 4 (GA4). To help with the transition, Google offers UA users an automatic migration to GA4, which will occur unless you opt out. In this article, you’ll find details about the automatic migration process, any possible issues that could arise during a GA4 migration, and other options available.
Migration to GA4
Google has announced that starting in March 2023, they will be configuring Google Analytics 4 for users. Suppose you currently have a Universal Analytics (UA) property but have not yet migrated to GA4. In that case, Google will automatically create a GA4 property for you based on many of your UA settings. This includes your goals, audiences, Ads links, users, and more. Additionally, even if you have already set up GA4, you may still be subject to automatic migration.GA4 auto migration process
Google will automatically migrate your account in three situations:
1. If you have an active UA property but still need to create a GA4 property.
2. If you have created a GA4 property but have yet to connect it to your UA property.
3. If you have created a GA4 property but still need to complete the setup process.
What are the criteria for automatic migration eligibility?
If you have a non-360 UA property and have received data in the past 12 months but do not use goals, audiences, or Google Ads integrations, the deadline for opting out of automatic migration was February 28, 2023. However, if your property uses goals, audiences, or Google Ads integrations, you have until March 31, 2023, to opt out.
Once the automatic migration for a UA property begins, the ability to opt-out will no longer be available. If a UA property is 360-enabled, it cannot be migrated automatically and must be manually migrated. You have until July 1, 2024, to migrate in accordance with Google’s current deprecation timeline.
Opting out of auto migration
Google actually suggests that it’s better to create your properties manually rather than opting for GA4 auto migration. Although this may seem like a contradictory suggestion, it’s actually wise to do so as the automatic configuration doesn’t hold much value if you manually migrate your settings. By carefully examining the disparities between UA and GA4, you’ll come to the realization that manual migration offers you some control over what is migrated from UA, how it’s migrated, and when. When it comes to creating Google Analytics 4 properties, this is particularly important.
How to opt-out?
Those with UA property-level Editor access can go to the GA4 Setup assistant page to enable or disable automatic migration for UA properties. Simply head over to Admin and look for GA4 Setup Assistant in the Property column. Scroll down to find the switch for Automatically set up a basic Google Analytics 4 property and turn it off. Suppose you missed the opt-out window and ended up with an automatically configured GA4 property you don’t want. In that case, you can go to the GA4 Setup Assistant and disconnect the Connected property. Then, proceed to delete your GA4 property.
Opting out via API
If you have UA properties that are eligible for migration but you don’t want to migrate them, you can use the GA Admin API method “setAutomatedGa4ConfigurationOptOut” to confirm their opt-out status programmatically. For more information on how to opt out via API, please check the details.
Opting out via add-on for Google Sheets
To opt-out of multiple properties at once, you can utilize the GA4 Migrator for Google Analytics add-on in Google Sheets. Once installed, choose “Set the automated GA4 setup opt-out status” and simply follow the on-screen instructions. This is particularly useful for managing automatically created Google Analytics 4 properties.
GA4 auto migration problems
Before considering automatic migration from UA to GA4, it’s important to note that the migration process depends on your event tracking setup. If you use multiple UA goal types, avoiding automatic migration is best. Additionally, it’s important to understand that there is a difference in the data model between UA (session-based) and GA4 (event-based), although both platforms allow for tracking similar details.
It’s also important to note that the automatic migration only includes integration with Google Ads. Integrate data with other platforms or tools such as data visualization tools, BI platforms, data warehouses, and CRM systems. There may be better options than automatic migration for you.
Even if you use Google Ads, exercising caution with automatic migration is important. The rotation of primary and secondary conversions in Google Ads with no data validation could result in double conversions and false CPCs. Please refer to the Bidding to GA4 guide—conversions section for more information.
Though the automatic migration tool has been around for a while, there are some issues with it:
- This direct mapping solution will disregard non-compliant GA4 tags, if they are present.
- If your current UA setup has any issues, those same issues will carry over to your GA4 setup.
- Using the GA4 function in UA may result in the exposure of PII in your Google Analytics 4 data, as the function cannot redact it from incoming data. Proceed with caution.
- It’s possible to violate GDPR privacy rules if inline remarketing settings are set to OFF but automatically change to ON. The Google Ads cost data importer also automatically enables the ad personalization feature in the GA4 setup wizard.
- Upgrading to GA4 provides an opportunity to improve tracking privacy by adding a consent mechanism during new property setup. The auto migration tool will retain the old tracking tags, allowing for the preservation of existing setups that do not comply with regulations such as GDPR.
- In GA4, you can only have a maximum of 50 custom dimensions and 50 custom metrics for your event setup. If you exceed these limits, the automated migration might prioritize tracking less important events while omitting those you depend on in UA.
- If your website uses mobile AMP pages, it may not be accurately reported by GA4 since it does not support AMP.
Bidding to GA4 conversions
If you allow Google to migrate your UA conversions without reviewing them, you essentially agree that these actions are still relevant to your business goals. This means that Google can change your UA goals to GA4 conversions and bid on them in Ads. However, if you don’t manually designate your GA4 conversion events as primary and import them, your conversion counts may be duplicated. It’s important to note that the auto migration process won’t automatically stop bidding on UA conversions when you start bidding on GA4 conversions.
If you haven’t set up these conversions, there’s a risk of automated processes spending your money in ways that don’t align with your current goals. This is particularly true when it comes to targeting ads to GA4 conversions. If you rely on Google to migrate your audiences, there’s a chance that they may not be up to par. As a result, you may end up bidding on audiences that aren’t optimized for your business needs.
Here are some issues with GA4 conversions and Google Ads auto migration/integration:
- The decrease in Google Ads prices could be due to issues with GA4 imported conversions, which can affect the effectiveness of CPA bidding.
- If you run GA4 imported conversions and Adwords conversions simultaneously, both set to primary for CPA bidding, it may cause inflation in Google Ads.
- Google Ads inflation may be happening because GA4 is counting conversions multiple times without removing duplicate same-session conversions. A visit to print order pages is one example of this.
Consider some examples of GA4 conversions where automatically imported goals could cause inaccuracies:
- If you’ve manually created a GA4 property using the setup wizard and linked it to UA, the default currency may have been changed from what was originally imported. This can result in inaccurate migrated GA4 goal values. Newly added GA4 events are not automatically converted to the local currency, which can lead to over or underbidding and incorrect Google Ads conversion values being recorded.
- When using Paypal with GA4, the exclude referral setting is not transferred over. As a result, conversions will not be properly attributed to SEO or PPC, but instead to referrals from Paypal.com. In order to fix this problem, you will need to make some adjustments to the referral settings in GA4.
- GA4 does not support importing Smart Goals, Duration Goals, or Pages/Session Goals.
- Unfortunately, RegEx URL and event-based goals cannot be imported and must be copied manually.
GA4 does not test or verify that a goal is working when it imports from UA into GA4. Furthermore, there’s no automatic validation when it rotates your Google Ads’ primary and secondary goals from UA to GA4 as the primary goal to use for CPA bidding.
Read more about GA4 auto migration issues.
What are the alternatives?
There are a few things that you may do:
- To avoid automatic migration, navigate to the settings and opt-out.
- To personalize your migration, you can manually import the GA4 transaction or conversion if you’re using Google Ads. After importing, review it to ensure there are no duplicates of primary conversions, and then opt-out. To prevent these changes from being overwritten, change the Bid on GA4 conversions to Mark as complete in the GA4 setup wizard.
- Your GA4 property may have been set up automatically if you missed the opt-out deadline. In that case, you can delete it.
- Please search for a substitute to GA4.
Conclusion
Moving your UA properties to GA4 can be difficult, whether you attempt it yourself or rely on Google’s automation tool. This task becomes even more challenging if you have a significant amount of data or a lot of customized configurations. Your data is crucial, and its accuracy, control, and integrity are equally important. Therefore, it is wise to weigh all of your options before beginning the GA4 migration process. One possible alternative is to use a different platform with a session-based model, such as UA, to gather more data automatically without the need for customized implementations.
How to connect Google Analytics 4 (GA4) with BigQuery
What is GA4 Big Query?
GA4 BigQuery is the integration between Google Analytics 4 (GA4) and Google BigQuery, enabling the export and storage of GA4 data directly into BigQuery. It can create custom reports and combine GA4 data with other datasets (Google Analytics, Google Ads, Google Sheets, Facebook Ads, etc.) within Bigquery’s cloud-based data warehouse environment.
What are the advantages of using BigQuery for GA4?
- Integration with Other Data Sources: BigQuery can easily integrate GA4 data with other datasets from various sources. This enables you to combine GA4 data with additional data sets, such as customer, marketing, or sales data, to understand your business comprehensively.
- Integration with Data Visualization Tools: BigQuery integrates with popular data visualization tools like Google Data Studio, Tableau, and Looker. This allows you to create interactive and visually appealing reports and dashboards based on your GA4 data within these platforms.
- Big Query uses SQL: In BigQuery, you can utilize SQL queries to interact with the data, enabling sophisticated analysis and exploration. This allows you to pose complex questions and obtain high-level insights from your GA4 data. Furthermore, BigQuery offers the flexibility to create reports with any desired combination of metrics, empowering you to tailor your analysis precisely to your needs.
- Flexibility and Data Exploration: With the direct transfer of raw data from GA4 to BigQuery, you can rest assured that there is no need to worry about data sampling. Sampling occurs when a subset of data is analyzed and used to represent the entire dataset. However, when utilizing BigQuery for GA4, there is no sampling involved. Unlike custom reports in GA4, which may be subject to data sampling, BigQuery allows you to work with complete, unaltered data, providing more accurate and comprehensive insights.
Cost /Billing of using BigQuery for GA4:
The cost of using Google BigQuery depends on several factors, including data storage, data processing, and data transfer.
Storage Costs: BigQuery charges for the amount of data stored in your tables and data sets. The pricing is based on the total data size, including both the original data and any derived tables or partitions.
- Query Costs: BigQuery charges for the data your queries process. The pricing is based on the total data processed, measured in bytes. Complex or resource-intensive queries may incur higher costs.
- Streaming Inserts and Data Loading: If you use the streaming insert method to load data continuously into BigQuery, additional costs may be associated with the streaming inserts. Batch loading of data from Cloud Storage or other sources may also have associated costs.
- Data Transfer Costs: Transferring data into and out of BigQuery can have associated costs, particularly when data is transferred from external sources or across regions.
Requirements for using BigQuery in GA4:
Before using BigQuery, there are several important prerequisites to consider. Here are some key points to keep in mind:
- Google Cloud Platform (GCP) Account: You will need a Google Cloud Platform account to access and use BigQuery. If you don’t have an account, you can sign up for one at cloud.google.com.
- Project Creation: Create a project within your Google Cloud Platform account. BigQuery resources and usage will be associated with this project.
- Billing Setup: Ensure that billing is enabled for your project. BigQuery usage is typically billed on a pay-as-you-go basis, and you need to have a valid billing account linked to your GCP project.
- Access Permissions: Manage access permissions for your project and BigQuery datasets. Grant appropriate roles and permissions to individuals or groups who will be using or administering BigQuery. This ensures proper data security and privacy.
- Data Organization: Organize your data within BigQuery using datasets and tables. Datasets serve as logical containers for tables containing your actual data. Design a logical structure that fits your use case and helps with data management.
Knowledge of SQL: Meeting these prerequisites allows users to leverage the power of SQL queries to analyze and extract valuable insights from their GA4 data stored in BigQuery.
How to connect GA4 to Big Query:
- Go to Google Analytics and click on “Admin.”
- In the “Property” column, look for “PRODUCT LINKS” and click on “BigQuery Links.”
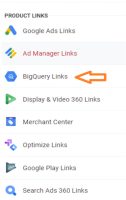
- Click on Link button.
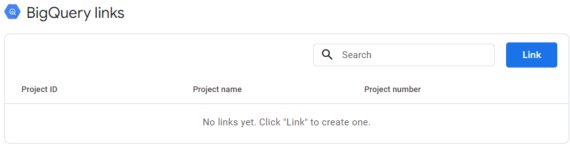
- Click on “Choose a BigQuery project” to see a list of projects where you have permission to read the data at least.

- Select the Project from the link and click confirm. You can only link one project at a time.
- Select a location for the data. Click Next.
- Select “Configure data streams and events” to choose the data streams you want to include in the export and specify any specific events you want to exclude.
- Select Include advertising identifiers for mobile app streams if you want to include advertising identifiers. Choose either a “Daily” export (once a day) or a “Streaming” export (continuous) of data. You can select one or both options.
- Review your GA4 integration setup setting, ensuring all configurations are in place.
- Once double-checked everything, click the “Submit” button to proceed.
- Your link is created.
Create a Google-APIs-Console project and enable BigQuery:
- Go to the Google Cloud Console (console.cloud.google.com).
- If you still need to do so, create a project or select an existing one from the dropdown.
- Click “APIs & Services” in the navigation menu and then “Library.”
- Click the “Enable” button to enable the API for your project. You will be navigated to a page as shown below.
- From the search results, click on the API you wish to enable.
- Search for Big Query API
- To access the API click on Create credentials.
- Grand the Access as required and click on the Done button.
The BigQuery Export schema in Google Analytics 4:
The BigQuery Export schema in Google Analytics 4 (GA4) refers to the structure and organization of the data exported from GA4 to BigQuery. It defines the format and layout of the exported data, specifying the tables, columns, and data types used to represent the GA4 events, parameters, and user properties in BigQuery.
- Datasets: Datasets in BigQuery are containers that hold related tables and provide a way to organize and manage data. In the context of GA4 export schema, a dataset represents a collection of tables that store the exported GA4 data.
- Tables: Tables are the primary components of the schema where the data is stored. In the BigQuery Export schema, tables correspond to different aspects of the GA4 data, such as events, event parameters, and user properties. Each table has a specific purpose and contains relevant columns to represent the data. These options allow you to export your GA4 data to BigQuery once a day or continuously, with the tables organized based on the chosen export method.
Option 1: Daily Export
- Choose this option to export your GA4 data to BigQuery once every day.
- A table named “events_YYYYMMDD” contains all the data for that particular day. The “YYYYMMDD” represents the actual date.
Option 2: Streaming Export
- Choose this option to continuously export your GA4 data to BigQuery throughout the day.
- An “events_intraday_YYYYMMDD” table is created and updated as new data is recorded in GA4.
- At the end of each day, the intraday table is replaced by the same full-day table mentioned in Option 1.
3. Columns: Columns represent the individual data fields within a table. In the GA4 Export schema, columns define the attributes or properties associated with events, parameters, or user-related information. Examples of columns include event name, timestamp, user ID, and parameter values.
4. Rows: Rows represent the individual records of data within a table. Each row contains values for the columns, providing specific information about an event, parameter, or user property. For example, a row might include the timestamp, event name, and corresponding parameter values for a particular event occurrence.