

Kenney Jacob


Kenney Jacob is the CEO of Ayruz Data Marketing and a serial entrepreneur with 18+ years in digital marketing. A trusted advisor to brands across travel, real estate, fashion, and tech, he brings deep cross-industry insight into scaling digital campaigns and go-to-market strategies. Featured in the EUIndia40 list of top leaders, Kenney is also a published author and a well-known speaker in India’s marketing ecosystem.
Kenney Jacob
Blogs

Experience A New Era Of Google Analytics
Migrate to Google Analytics 4 now and prepare your business for the future of data-driven marketing.
Why migrate to GA4?
Your data may not be as good as you think
From enterprises to small companies, many have resisted the change as it has many implications, specifically:
- Upgrading to GA4 requires the creation of an entirely new property with no history
- Only basic settings from the old version were copied to new
- Conversions, audiences, and events need to be built from scratch
- Advanced measurement is automatically enabled but you must protect user privacy
Download the GA4 Migration Checklist
Migrating from Universal Analytics to GA4
Google has announced that it will stop processing data to Universal Analytics during 2023. For standard accounts Google Analytics on July 1st, 2023, and Google Analytics 360 accounts on July 1st, 2024. Use this guide to help transition your existing Universal Analytics properties to the new GA4 standard.

| Create a new GA4 analytics property | You can create a brand new property or use the GA4 Setup Wizard to create a GA4 property linked to an existing UA property. |
| Define your Data Streams | Unlike UA, GA4 properties can accept and combine tracking data from both mobile apps and the web via multiple data streams. |
| Update your Goals and Conversions | GA4 conversions combine UA Goals and Ecommerce conversions. In GA4, conversions are only counted when an event is received with a name you have specified as a conversion event. |
| Evaluate your Ecommerce tracking strategy | Some of the events native to UA’s Enhanced Ecommerce feature are not present in GA4’s list of ecommerce actions. |
| Evaluate Marketing Channels strategy | GA4 does NOT currently let you edit the default channel definitions or create custom channel definition, but this functionality is coming during 2022. |
| Update your tags in Google Tag Manager | GA4 events are structured differently than those you’ve been sending to Universal Analytics. GA4 events do not carry forward the category, action, and label hierarchy from UA. |
We have developed a Data Studio Template for GA4, which looks similar to Universal Analytics to make your migration smoother.
Google analytics 4 is the future of marketing analytics
The evolution of analytics provides integrated and automated insights to create and target the most appropriate audiences. Early adopters of Google Analytics 4 will start the journey to next level competitive advantage.
| Future-proof your analytics | By adding GA4 to tag your site today alongside your existing UA tags, you create enough historical data when UA is fully utilized, reducing the risk of data loss. |
| Single View of Customer Journey | Google Analytics 4 integrates data collection from both mobile apps and the web which caters to a single view of the customer journey across multiple devices. |
| Privacy Centric User Data Tracking | The Future of tracking, respects privacy. By migrating to GA4, you can comply with all data protection laws and enable powerful user data control & privacy. |
BENEFITS OF USING GOOGLE ANALYTICS 4
| FREE TO USE | One of the major benefits of using Google Analytics is that it allows a free version of GA4 with some limited features. There are numerous other analytics tools available that work similar to Google Analytics; however, all of them charge a premium as subscription charges. |
| EASY INTEGRATION WITH GOOGLE ADS | Google Ads and Google Analytics, both these tools are really important for marketers who are in the lookout to grow their business. While both have individual strengths, linking Analytics and Ads together lets the professional to properly set up goal tracking, conversion tracking and see how effective the ad campaigns prove to be. |
| CUSTOMER SEGMENTATION | With the help of Google Analytics, we can easily segment the visitors in many ways, such as location, the device used, gender, time spent on each page, demographics, visitors who came to the site on a particular time, etc. With this information, we can optimize the campaigns that are being planned and come up with better solutions to get more visitors to the site. |
| GOAL SETUP | In Google Analytics, we have an option to set up required goals that are in sync with our marketing requirements. For example, if we want to know how many visitors are clicking on a particular button given in the site, the clicks on that button can be defined as a goal and afterward, the number of clicks would be tracked and shown as a separate report. This would help a great deal while running ad campaigns having specific goals. |
| CONVERSION TRACKING | With the help of Google Analytics, you can fix certain events as conversions and then track whenever those events occur separately. For example, if our desired action is to place a lead on the website, then the lead generation event can be set as an event and it can be tracked separately. It will help us in calculating the ROI and effectiveness of the campaign. |
| CUSTOMIZED AUTOMATED REPORTS | Marketing teams and management always needs reports to take decisions. With Google Analytics we can create customized report templates that will run every day or week or month and send you the report automatically. This eliminates the need to manually look into the analytics every time you need to know what is happening with the traffic on your site. |
GOOGLE ANALYTICS AGENCY FOR E-COMMERCE
Google Analytics comes with special features dedicated to E-commerce website owners and marketing heads. Through GA, we can track the traffic sessions, and correlate that data with the sales, bounce rate, traffic sources, landing pages, etc. Armed with this information you can determine the effectiveness of your traffic sources, your marketing channels, and your website pages. Ecommerce measurement allows measuring the number of transactions and revenue that your website generates. Once the user clicks on the purchase button in the browser, the user s details such as purchase information are given to the webserver which includes the transaction. If it is successful, the server redirects to the “Thank You or success page with transaction details and a receipt of the purchase. You can use the analytics.js library to send the commerce data from the thank you page to Google analytics.
You are in good hands
| AUDIT | Even though a Google Analytics implementation looks straight forward, in most cases it's not set up properly. Proper implementation of GA requires supervision from a seasoned marketing professional who is GA certified. An audit will look at the data which is being tracked for integrity, quality, and maturity. |
| STRATEGY AND IMPLEMENTATION | Based on the business and the purpose of the website a strategy will be defined to implement Google Analytics. At this stage, we will define the reports the business requires to take decisions, the data we need to track to enable us to take those decisions and how to capture that data using GA. |
| MONITORING AND REPORTING | As your analytics collects data, Ayruz Google analytics agency will monitor it and provide you with reports that are relevant to your business. These reports will help you take key business decisions. |
| OPTIMIZATION | Any Google Analytics implementation requires continuous optimization as we learn more about the traffic and the business. These optimizations help you stay on top of the business. |
GA4 Services
End-to-end Google Analytics 4 Implementation, Migration & Maintenance
Migrate to Google Analytics 4 with a Google Certified Partner. Google Analytics 4 (GA4) is the newer version of Google Analytics, and it is the new standard in measuring digital traffic and engagement across your websites and apps in one location. At Ayruz, we offer GA4 migration services to help you seamlessly move from GA3 to GA4. Our team of dedicated migration experts will work with you to ensure a seamless transition so you can continue tracking critical data and measuring your success with Google Analytics.
Google Analytics 4, the latest version of Google Analytics, offers new features and capabilities to help you measure your success more effectively than ever before. GA4 offers improved data collection, new ways to measure conversion, and expanded reporting capabilities that will give you a complete picture of your website’s performance.
With our GA4 setup services, you’ll be able to create custom reports and dashboards that give you insights into every stage of the customer journey, extending from the initial visit to the final conversion. As a result, you’ll have access to a wealth of data to help you better understand your customers and make more informed decisions about your marketing efforts.
Google Analytics 4 Services we provide you include:
- Google Analytics Strategy
- Google Analytics Audit
- Tag Management Google Analytics QA & Reporting
- Google Tag Manager Migration
- Data Streams, Dashboards & Reports
Early adoption of GA4 also means that your organization can collect more historical data to form marketing strategies based on informed decisions ahead of your competitors switching to GA4.

This Is How An Aspiring Data Scientist Buys A Second Hand Car
I’ve been wanting to buy a Honda city ever since I saw a modified one owned by a friend. So I started looking for a good deal, and as any other person would do I went over to Google and started searching. Obviously, I ended up in those second-hand car listing sites.
Those sites are like a jungle, too many listings, too many models, a wide range of prices. How will I decide Which car to buy and what price to pay for it? Lets put to use some of those things we learned in school and college.
Step 1 – Get the raw data
I got a techie friend to write a script to scrape the data from those sites for the car Honda City. The script output an excel file with the following fields
- Year of manufacturing
- Odometer reading
- Price
Since it was a Honda city I need not consider fuel type. Only petrol was available until recently.
Step 2 – Cleaning up the data
Some entries have wrong information, some entries are incomplete. There are 2002 models listed for 10 lakhs, such entries are not genuine entries. So I sorted the data, found all such entries and deleted them. Now I am left with an excel sheet of around 1000 listings.
Step 3 – Visualizing and analyzing
Since it is very hard to generalize information contained in a 1000 listings I started visualizing it. The simplest visualizations are scattering plots. Lets plot year of manufacturing on the X-axis and listed price on the Y-axis.
The price of the car drops sharply during its initial years. The sharp decline in value continues up to 2007 – 2008 and then it starts to level off. New cars lose half of their value in the first 4-5 years of ownership.
Let us look at how the price varies with the odometer reading of the car. For this, I plotted the graph and did a regression to get the best fit curve.
Here also the price of the car drops steeply during its initial time. Then it starts to level off by around 75,000 KMs and stays flat for very long mileage.
Step 4 – Drawing Inferences
Since the price of the car depreciates sharply during its initial years it better to find a car that is around 5 years old. In the case of Honda city, the best deal would be car 2007 or 2008 model that has not done more than 75,000 KMs. You can drive that car for another 5 years and 75,000 KMs without losing a lot of its value.
Disclaimer:- The inferences are purely based on data, I am not responsible if you use this technique and end up in a mess. Always use the help of a good mechanic and inspect the car. These are mechanical devices and are susceptible to a lot of issues.
Promotion
This was simple, but if you are sitting on tons of data and wanting to analyze it with all the latest tools and visualization techniques contact my friend at sanil@ayruz.com who is a proper data scientist. He can do magic with your data.

Saavn’s Brand Marketing Strategy with Ranbir Kapoor
Saavn is a music streaming website of English, Bollywood and regional Indian music. Though it was launched in the year 2006, the brand got its name coming up after a certain period of time with their effort to produce better experience to the people who used it.
RANBIR KAPOOR AS CREATIVE PROMOTER OF SAAVN
Ranbir Kapoor was presented as the Creative Promoter of Saavn in the year 2014 and the star seemed to be happy about the tie-up. In his talks, he said about how he would help Saavn in getting up to date with the new generation music and promotions. He kept his word.
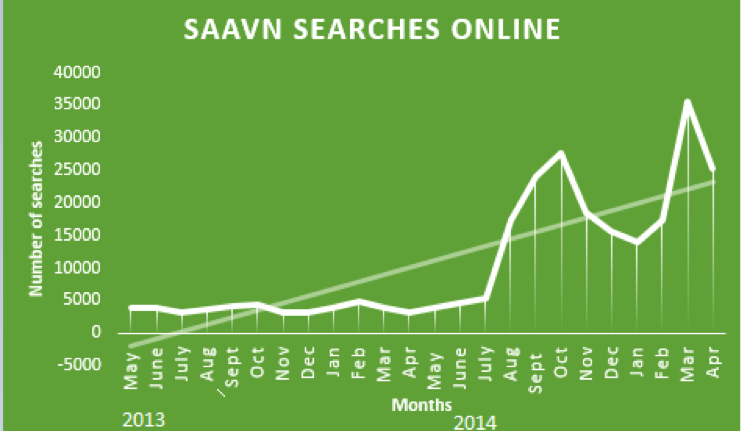
As it is evident from the graph, after Ranbir Kapoor was endorsed as the Creative Promoter, Saavn had much more searches on the internet as well as the increased app- downloads. People started to gain interest in the brand as they had their favorite actor promoting the same. Searches for Saavn in the month of May 2014 did not account to much. It did not rise much until August when RK had his collaboration with the company and his advertisements released. That is, in a span of three months the searches on Saavn rose to 20 K and again in September, it rose to a peak of 30K. Therefore this peak in the search was surely due to RK endorsing the brand and being the Creative Promoter.
RANBIR KAPOOR COMMERCIALS FOR SAAVN
The young Kapoor did not stop with that. Along with his collaboration with Saavn, he had a commercial released in which the star talked about the benefits of free and legal music streaming. This was also a reason for the increased searches and recognition of the brand. The searches for the brand seemed to be stable until the advertisement came out in January. In January 2015, the searches again went high.
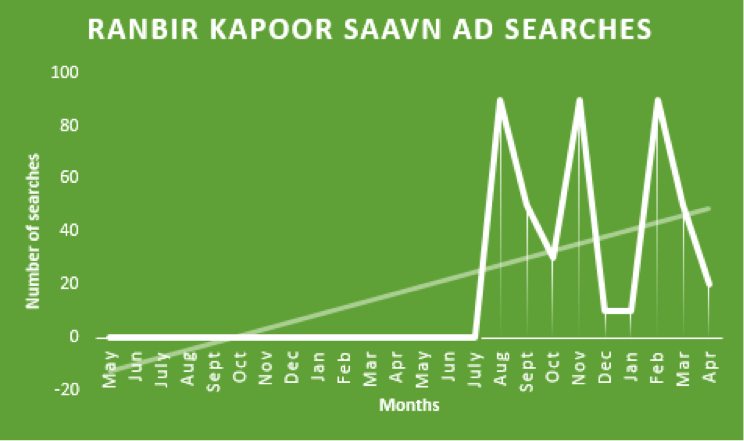

The brand moved with the world from then. It created commercials during the World Cup and Valentine’s Day with Ranbir Kapoor’s manner of talk being the sole attraction. One of the commercials being censored seems to have been widely spoken and searched about. The commercials were not too long, but short and crisp so as to just tell the world what they want to and that must have had a great impact on the generation for we do not prefer wasting time. The number of views of the advertisement was very high. Saavn’s advertisement searches were stable continuously until Feb 2015 when the two advertisements, one for Valentine’s Day and the other regarding the World Cup was released. From 5K searches in January it went up to 7K in a month’s time and to 10K in another month, that is in March. This shows the impact that the advertisement had. This is clearly visible even in the increased searches for Saavn during these months.
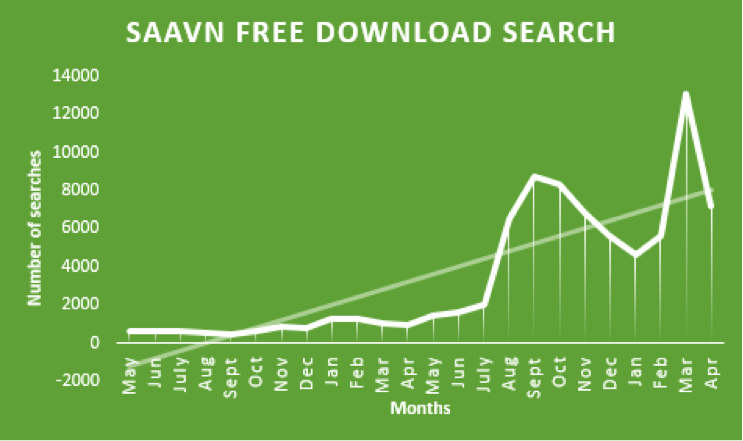
SAAVN FREE APP DOWNLOAD
They made a huge offer for the customers who viewed the advertisement online. Whoever watched the advertisement was able to download songs from Saavn for free. That made a great impact on the audience and as you can see from the graph below, people searched more for ‘Saavn free downloads’ as that search directly led the page to the advertisement. The searches increased from 6500 in August to around 12000 in March.

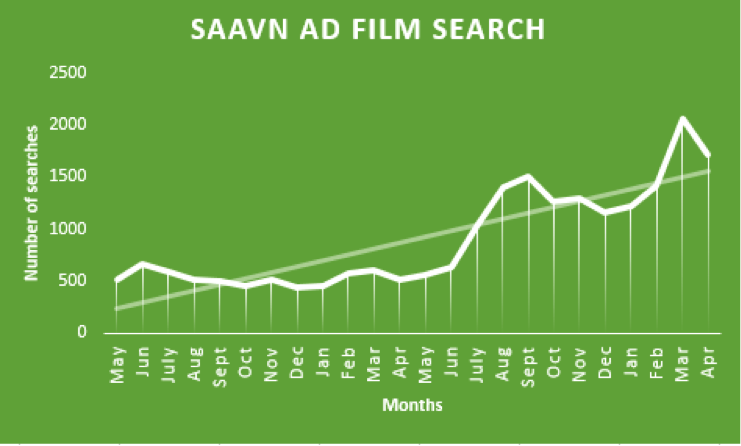
SAAVN RISES THROUGH THE AD FILMS
Saavn’s advertisement strategies had an impact on the customers as you may see from the graph given below. The searches for the advertisement was very low until Ranbir Kapoor took over. From August 2014, as you may see, the graph rises and after January 2015, when the advertisements have released the graph for Saavn ad film searches hit 2K.
SAAVN TIES UP WITH SNAPDEAL
Saavn had initially started with movies and later looking at the Indian trends, shifted the focus onto music as they say that they found better opportunities for improving the quality of listening to music than movies They even had a tie-up with Snapdeal during November 2014 where they gave the customers who made mobile purchases the Saavn app free. That must also have added on to the increased searches for the brand as the people who bought the phones would have been curious to know what it was that they were offered by the company. The online search for free Saavn pro app increased as a result.

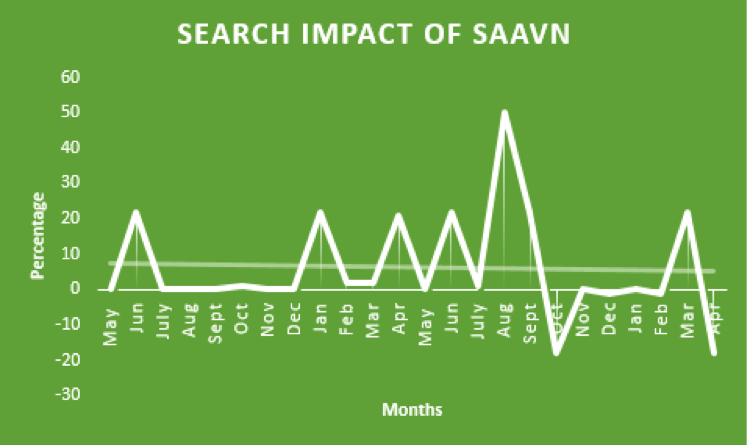
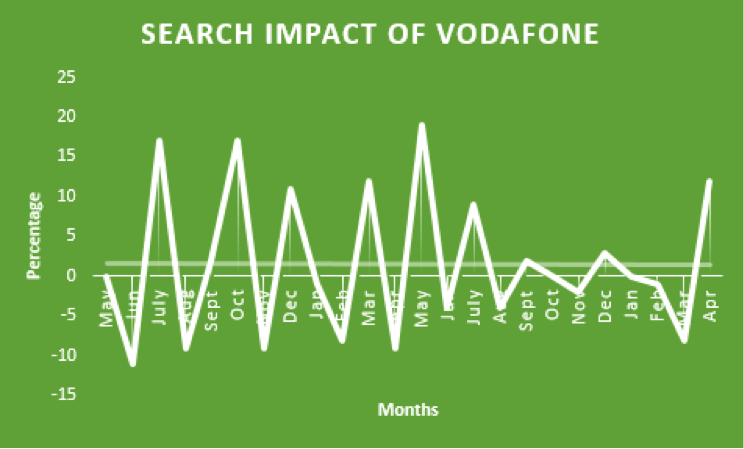
SAAVN SPONSORSHIP FOR IPL
Saavn had sponsored for the IPL Cricket Season in the year 2013, where the company was featured while the game went on.

The impact that the sponsorship had on Saavn was low and thereby did not increase the searches for the same. As it is seen from the graph there is no much search impact for Saavn even after the ads were featured. In the case of Vodafone and its ads during IPL, there is a much greater impact on the company. This might account to the tremendous push given by the company in order to bring it to the limelight. There is a huge difference in the manner and number of advertisements made by Saavn and Vodafone. Thus it is not possible for us to totally make a comparison between them. But the advertisements did create an impact on Vodafone when compared to Saavn.
It was later that they launched Saavn English and Saavn Pro, considering the people’s interest in independent English music and listening to music offline respectively. There too Saavn met the need of the hour.

Email Marketing Strategies For E-Commerce Companies
Email marketing has become the norm for brands to reach out to customers, build a loyal base and increase customer retention. What makes it so appealing is that it’s affordable and open to small and large businesses alike. Consider this – in 2018, global email users numbered a staggering 3.8 billion. The figure is projected to grow by almost a billion in 2023. With so many people logged in to the internet, it’s only logical that companies finetune email marketing solutions and reap the rich benefits. Here are a few strategies for 2019 that can help businesses stay relevant and connected to their customers.
Effective Email Marketing Strategies
1. Create Refer And Earn Programs
One person’s referral can be worth its weight in gold. People are more likely to buy from a certain brand if someone they know and trust already has. According to Nielsen, 92 percent of customers trust referrals from people they know. Programs that reward a customer when they ‘refer a friend’ are a great way to expand a brand’s reach. There are several program ideas to try such as offering discounts, providing cash rewards as part of a contest, or providing a freebie. Referral emails can target customers who have made more than one purchase and those who have provided good feedback. They’re more likely to bring in sales than one-time customers.
2. Utilize Special Occasions
The holiday season, national holidays and similar special occasions are the perfect time to launch new deals. Why? Because people are in a mood to spend. According to Mastercard SpendingPulse, retail sales in the United States from November 1st, 2018 to December 24th, 2018 increased by 5.1 percent – more than $850 billion! Meanwhile, Adobe Analytics reported that online sales hit $3.7 billion on Thanksgiving Day. That’s a 27.9 percent growth year-by-year compared to 18.3 percent in the year 2017. Using the opportunity to organize tempting holiday email campaigns can draw in new customers. These special occasions are also the perfect time to send email offers to existing customers and targeted segments of mailing lists.
3. Have Customer Loyalty Programs
Loyalty programs are important because they focus on creating lasting relationships and customer retention. Turning a quick profit is not the goal here. Rather, it’s about making customers know that they’re valuable and that their patronage is appreciated. It could be as simple as sending a wish on their birthday, offering a discount coupon or letting them use reward points on how they want to.
4. Personalize Promotional Campaigns
A promotional email marketing strategy benefits both customer and business but adding a personal touch ensures better customer satisfaction. The first step is segmenting customers into lists such as demographics, type of products purchased, the amount spent, etc. For instance, customers who have purchased certain types of products in the past can be targeted with similar ones. Or, emails can use a certain type of language and tone depending on the customers’ demographic to better connect with them. There are email marketing tools to send bulk emails. They also allow users to personalize emails and send them to specific mailing lists.
5. Use Brand Colors
A simple way to imprint a brand in customers’ minds is to reflect the brand’s personality in emails. It’s part of a larger brand digital strategy where the logo, tagline, brand name, and brand colors come together to make people remember. People receive dozens of emails a day and unless a company stands out from the din, it will easily get lost. It’s essential to reflect what a brand is about with the right colors, typography, and design elements.
6. Inform Customers When Items Are Back In Stock
Items go out of stock all the time but the inventory will be filled soon, give customers an opportunity to be notified by email when that happens. They’ll appreciate the gesture as they don’t need to log in and out of the site to check if the item is back in stock. It’s also a smart way to increase lead generation. Instead of hiding items that are out of stock, display them and add an option to be notified by email.
7. Follow Up With Automated Emails
Automated follow-up emails can boost the lead generation process. It takes the drudgery out of it and smoothens workflow. It’s relevant and timely, saves big money and saves a lot of time. Email marketing companies offer a range of tools including automation and personalization. Automated follow-up emails can comprise notifications for product reviews, sale on items on wish lists or carts, etc. On a side note, automation can also be used to welcome new subscribers (perhaps with an offer) and send a ‘thank you’ note for purchasing something.
8. Send Friendly Reminders On Abandoned Carts
According to Baymard Institute, high extra costs like shipping and tax, account creation requirement, and complicated checkout process are among the top reasons for abandoned carts. Baymard also estimated that the average cart abandonment rate is 69.57 percent. That’s high and it can be frustrating seeing potential leads fall flat. However, instead of sending pushy reminders, conceptualize friendly and creative emails that encourage customers to return to their carts and hopefully make a purchase. Humor, a sense of urgency for e.g. Items in the cart are almost sold out!, and a helpful attitude such as Do you need help with your order? etc. are some examples. Images of the products abandoned in the cart, adding a link to the cart, and giving offers to the existing cart can also nudge customers.
There are other strategies that can be taken such as delivering regular content via newsletters, actively asking for reviews, and reminding customers about wish lists. Email is a powerful marketing tool with the potential to convert leads into sales. However, it isn’t always leveraged properly and this can mean huge losses. Fortunately, it isn’t difficult to get up to speed and these email marketing tips and strategies give a gist of how to go about it.
Inbound Marketing?
Are you fed up with the traditional marketing methods? Try out Inbound Marketing that attracts customers by creating valuable content, specially catered keeping them in mind and be visible to them when they’re trying to figure out answers to their queries. With the help of this infographic, you will get a brief idea of what inbound marketing is and get a grasp on how it will be beneficial for your business.
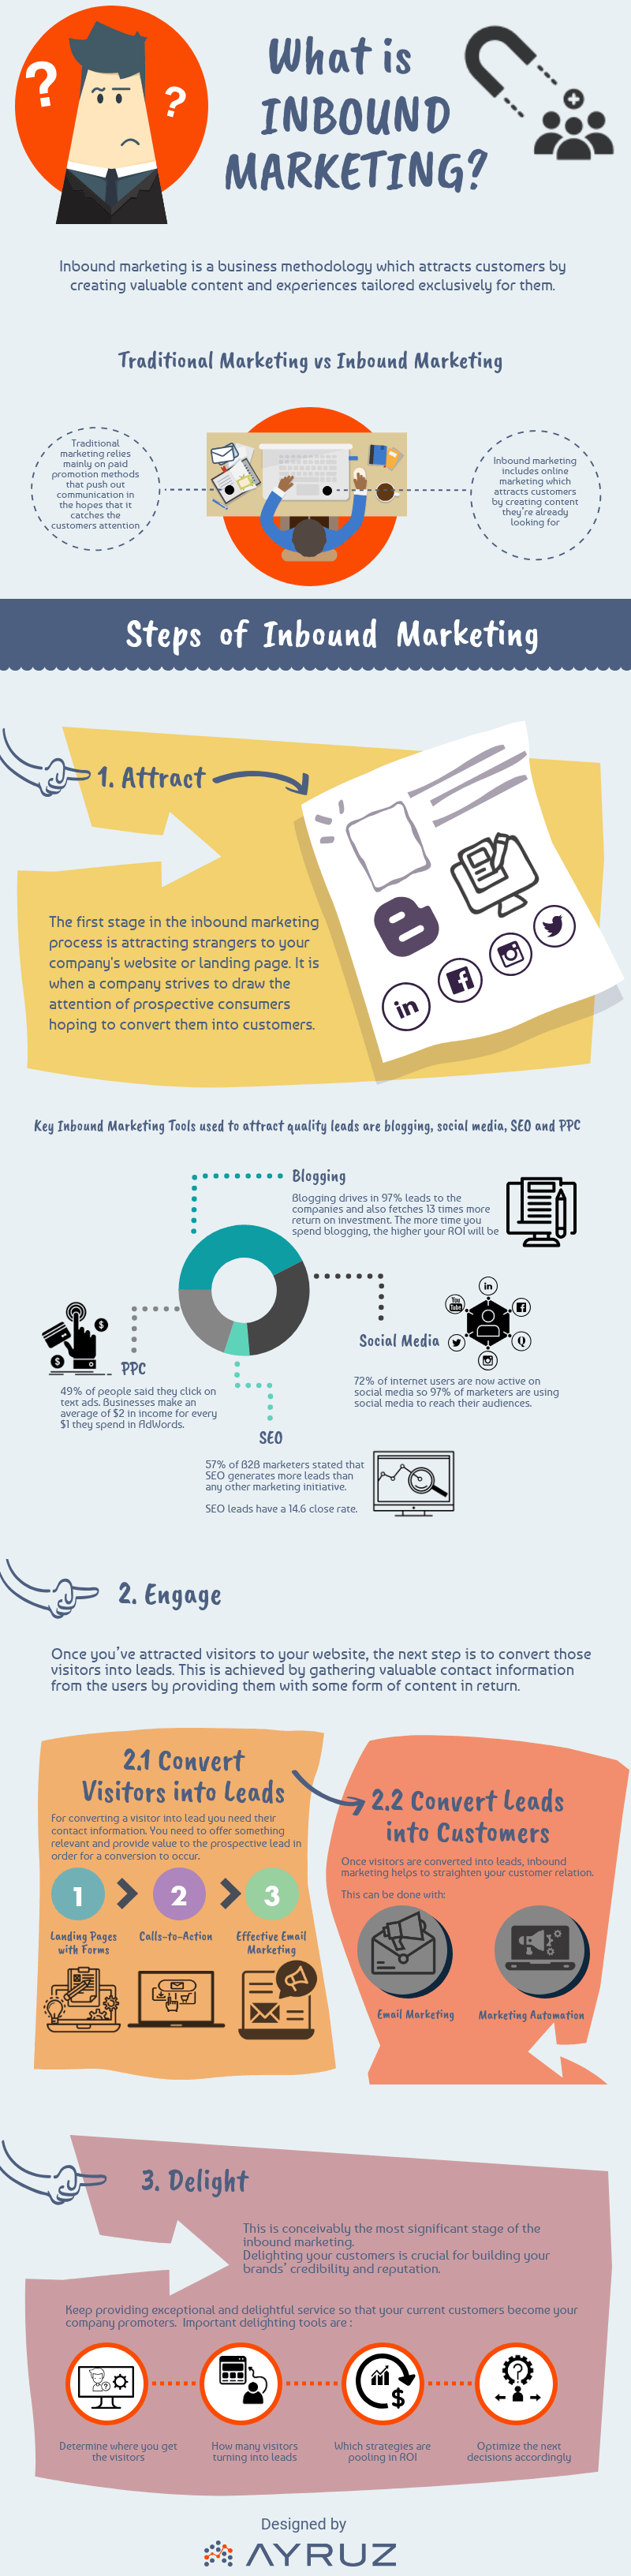
Want to understand more about Inbound Marketing? Get in touch with our inbound marketing expert for a free 30 minutes session.
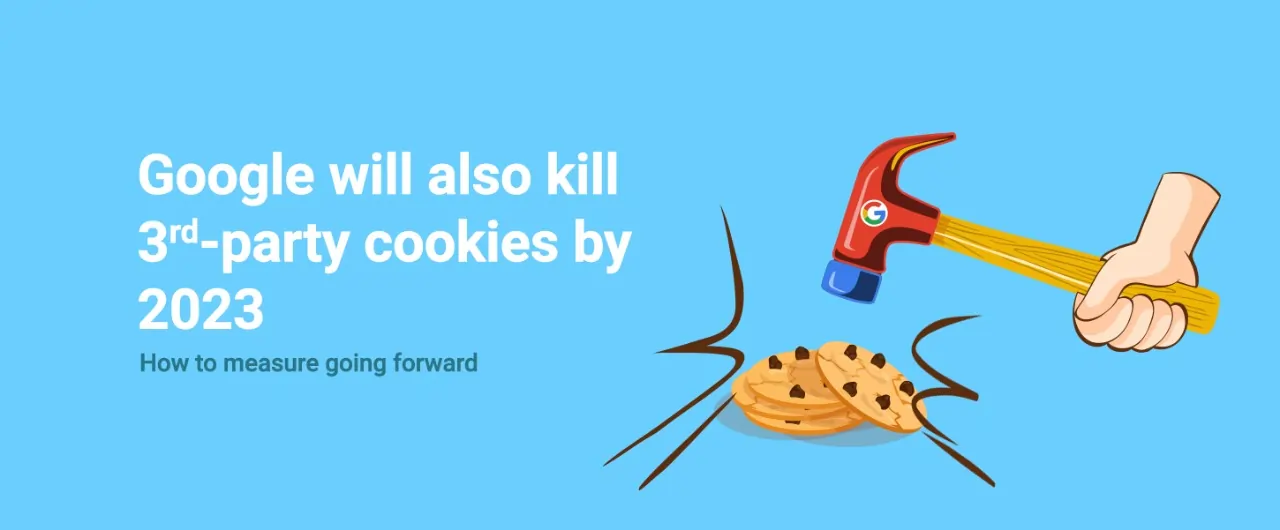
Google will also kill 3rd-party cookies by 2023: How to measure going forward?
The holy grail of digital advertising is the measurement capabilities that come with it, rather than shooting in the dark. Now that Google Chrome will stop supporting 3rd party cookies by 2023, how to measure going forward?
As you are already aware, Safari and Firefox have already killed 3rd party cookies. However, Chrome being the most-used browser, this shift will be even more consequential for the ad industry, and ‘cookiepocalypse’ is something widely discussed by marketers in concurrence with the obvious questions:
How will we meaningfully engage with our brand audience?
How will we measure the effectiveness of the digital campaigns and attribute?
If you are a brand or a marketer, it is time to understand the ramifications of the end of 3rd party cookies on digital advertising, and how you can prepare for the future- challenges and opportunities that lie ahead of you.
There is no need to worry, Google Tag Manager Sever-Side Tagging can help you in the post-cookie-less world.
What is a 3rd-party cookie?
Unlike a 1st-party cookie, which is set directly by the website the user visits, a 3rd-party cookie is set by a website other than the one the user has visited.
3rd-party cookies are used as user identifiers and track the user activity across websites they visit in order to send them highly personalized ads based on their interests, online behavior, and the sites they visit.
For Internet users, it is hard to control the data captured and shared by 3rd-party cookies. 3rd-party cookies do not provide users any visibility into the brands processing their data and when they are being followed across the internet.
Data Protection Regulations
The growing concerns around consumer data and privacy have paved the way for legislation like GDPR and CCPA. The regulations empowered consumers to be in charge of their data. Therefore, it is important for brands to create transparent standards for user privacy and adopt means to collect user data that are aligned with regulatory requirements.
Key events: End of 3rd-party cookies:
- 2016: The European Union enacted GDPR (General Data Protection Regulation), which requires websites to seek explicit user consent before tracking users with cookies.
- 2017: Apple announces ITP (Intelligent Tracking Prevention) for Safari to block 3rd-party cookies.
- 2019: Mozilla brings out ETP (Enhanced Tracking Protection) for Firefox and announces that Firefox will block all 3rd-party cookies by default.
- 2019: Apple announces ITP v2.1 for Safari, and it will block all 3rd-party cookies by default.
- 2020: Google announces a plan to kill 3rd-party cookies by 2022.
- 2021: Google announces restricted use of Android IDs by the end of 2021.
- 2023: Google’s revised deadline to killing 3rd-party cookies in Chrome.
And now, brands need to run early on and start measuring without 3rd-party cookies, while respecting user privacy and the regulations that are in place.
3rd-Party Cookies Never Have Been Great
That being said, 3rd-party cookies were never aligned with user data privacy, and they haven’t also been the ideal way to measure the effectiveness of digital campaigns. Here are a few we can dive into:
The use of 3-party cookies and/or the last-click attribution model has resulted in an incomplete picture of the effectiveness of your advertising that truly drives your business outcomes.
Cross-channel tracking with 3rd-party cookies has been getting increasingly difficult due to different platforms using different sets of user identifiers and the walled gardens built by tech giants.
3rd-party cookies have been notoriously poor in measuring the long-term effects across devices and platforms for a while because of the ongoing evolution of the internet, with the same users often owning and using multiple devices. Imagine your target audience wading the internet with their: Smartphone web-browser, Smartphone in-app browser, Smartphone native app, Laptop web-browser(s), Tablet web-browser, Tablet in-app browser, Tablet native app, Smart TV, etc. All of these work with different user identifiers.
12 days is the half-life of an average ad tech 3rd-party cookie. 50% of the cookies placed are dead just 12 days after they are dropped.
The attribution accuracy of 3rd-party cookies for their consumer identity match rates hovers around a poor 40% and 60%.
Importance of 1st-Party Data and How GTM Server-Side Tagging Can Help?
In a world where tech giants are consolidating their dominance by building walled gardens by collecting massive amounts of 1st-party data, and then restrictive access to that data, it is critical to prepare your own 1st-party data strategy.
For brands to meaningfully engage with their target audience and measure the effectiveness of digital campaigns in the post-cookie-less world, they need to embrace a 1st-party data strategy and consent-based advertising by seeking user content before collecting and processing user data.
When done right, 1st-party data and implementing Google Tag Manager Server-Side Tagging can map user behavior for better ad targeting and intent data measurement that respects user privacy and is compliant with regulations.
Learn more on how you can easily use Google Tag Manager Server-Side Tagging to convert 3rd-party cookies into 1st-party cookies, stay compliant with GDPR, CCPA, and other regulations, and at the same time bring additional benefits for your target audience like: better user experience, faster website loading, and more with GTM Server-Side Tagging.

Death of 3rd-Party Cookies: How to convert 3rd-party cookies to 1st-party?
I presume, by now, you are already aware that the 3rd-party cookies are being killed. Mozilla has axed 3rd-party cookies on Firefox (RIP: September 3, 2019), and Apple followed suit on the Safari browser (RIP: March 24, 2020). Both block all 3rd-party cookies by default to accentuate user privacy.
Google has also taken an important step toward user privacy to depreciate 3rd-party cookies by the end of 2023.
Not just web browsers, Apple’s April 2021 iOS update 14.5 featured a new consent protocol called App Tracking Transparency (ATT) that gives iOS users more control of how apps track their behavior across other companies’ apps and websites.
Apple devices have a unique number- the advertising identifier that can be used to uniquely identify your device for the purposes of ad targeting and tracking. Apple’s ATT governs and regulates how apps and advertisers can use uniquely identifiable data to target, measure, and optimize campaigns.
All of these are the aftermath of the data protection and privacy regulations like the GDRP and CCPA to curb the invasive digital marketing behavior from brands that the digital consumers have endured thus far.
That said, there are a lot of brands that understood such consumer frustrations long back and pioneered in creating refined customer experiences at moments that matter, non-intrusively for their audience. But the digital consumers were still out in the open with most brands who did not respect consumer data and privacy, and then came the iron hand, the data protection regulations.
- Now that the 3rd-party cookies are being killed, how can brands measure in the cookieless world?
- What is the use of Google Tag Manager (GTM) Server-Side Tagging?
- How can GTM Server-Side Tagging help you stay compliant with GDPR and CCPA?
- What are the benefits of GTM Server-Side Tagging?
- What are the additional benefits of GTM Server-Side Tagging?
What is the use of Google Tag Manager (GTM) Server-Side Tagging?
Currently, most of the measurement tags are served via the client-side, from the user’s web browser using tag management solutions like Google Tag Manager (GTM). With this model, the user’s browser directly interacts with 3rd-party analytics services, making the cookies stored in the user’s web browser 3rd-party cookies.
On the other hand, the Google Tag Manager (GTM) Server-Side Tagging helps you run your measurement tags on the brand’s cloud server (server-side) via GTM Server-Side Tagging and a cloud platform like Google Cloud Platform (GCP) instead of running the tags directly on the user’s web browser (client-side).
Client-Side Tracking In Action
Server-Side Tracking In Action
How can GTM Server-Side Tagging help you stay compliant with GDPR and CCPA?
As we have seen, the GTM Server-Side tagging brings an intermediary cloud server (owned by the brand) between the user’s browser and the 3rd-party analytics service.
So, there are no 3rd-party cookies being generated in this process on the user’s browser. The cookies generated are 1st-party cookies.
With the GTM Server-Side Tagging, you can effectively convert your 3rd-party cookies to 1st-party cookies, and you can stay compliant with data protection regulations like GDPR and CCPA.
Beyond this, GTM Server Side Tagging Implementation also brings other benefits for the brand and the brand’s audience. Let us see them too.
What are the benefits of GTM Server-Side Tagging?
On the tracking front, the Google Tag Manager Server-Side Tagging helps you circumvent tracking restrictions that are in place for 3rd-party cookies and offer reliable tracking.
On the measurement front, the Google Tag Manager Server-Side Tagging helps you bridge the blinding data gaps in the conversion paths that brands have faced historically, making it difficult for them to properly understand the customer’s purchase journey, and advertise and engage with them profitably.
Not just these, the GTM Server-Side Tagging brings brands a bouquet of additional benefits that can critically impact the experience of your customers and your target audience. Let us take a look at some of the additional benefits of implementing GTM Server-Side Tagging.
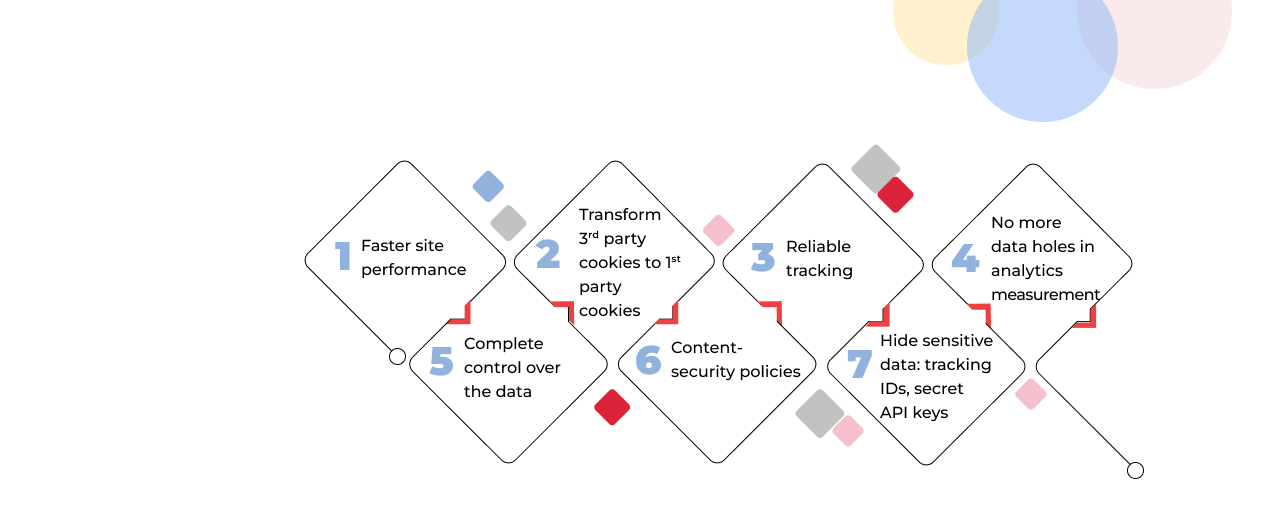
What are the additional benefits of GTM Server-Side Tagging?
- Faster site performance
- Transform 3rd party cookies to 1st party cookies
- Reliable tracking
- No more data holes in analytics measurement
- Complete control over the data
- Content-security policies
- Hide sensitive data: tracking IDs, secret API keys
Download our free whitepaper on GTM Server-Side Tagging
Are concerned about the technical gaps you have on the matter?
Not to worry, we have a free whitepaper for you on the matter- all about the killing of 3rd parry cookies and how you can measure and engage with your customers in the cookieless world.
If you still need help with your GTM implementation, our team can help. Enter the cookieless world body with GTM server-side tagging.
We have end-to-end Google Tag Manager Server-Side Implementation, migration & maintenance experience.
You are in good hands. We have helped startups to Fortune 500s for their analytics, measurement, and digital transformation journey.
Talk to us for a free consultation today.
Improve the page-load speed of your brand website with Google Tag Manager Server-Side Tagging
If your brand is all about providing a great experience for your audience, then you understand the importance of a faster loading website like we do.
Page Load Speed Matter: Here’s Why
Slower loading websites hurts the user experience, your brand experience, especially if they have landed on your website the very first time- a new user, your potential customer. It also considerably impacts your key metrics, and the ROI from your paid campaigns.
Let us take a look at some key stats from Google to corroborate. According to a research conducted by Google if a website takes more than 3 seconds to load, 53% of users will leave, and Google estimates that on an average it takes 22 seconds to fully load a mobile landing page.
How Google Tag Manager Impacts Page Speed
Thanks to Google, when the first version of Google Tag Manager was released, brands and marketers were happy about the critical impact it can offer on page load speed by implementing tags from Google Tag Manager. GTM cut the need for tracking scripts to be hard-coded, but could be fired directly from the GTM container.
How Google Tag Manager Server-Side Impacts Page Speed
Now, you can fire up your website to load even faster with the Google Tag Manager Server-Side Tagging. You can do this when you move your GTM tags from the Client-Side Tagging to GTM Server-Side Tagging.
If you would like to explore the difference between Client-Side tagging and Server-Side tagging, you may head over here.
How does GTM Server Side Tags speed up your website?
Let us explore how GTM Server Side Tags can help speed up websites when you migrate from GTM Client-Side tagging or the old-school hard-coded tracking implementation. You need to be aware that, if you choose to combine both server-side tracking and browser/ client-side tracking, you will not be able to see any page speed improvement.
The server container feature that Google rolled out for Google Tag Manager and Tag Manager 360 in 2020 allows brands and marketers to move their tracking and measurement tags to a server container hosted in the cloud. With this implementation websites can load faster, tracking will be more accurate, and brands can ensure they are compliant with regulations like GDPR and CCPA, ensure more data protection, and more.
Historically, tracking and measurement tags are loaded directly on the user’s web browser (Client-Side tagging), and when you move all the client-side tags to the cloud server, that will help your brand website to load faster on the user’s browser, impacting their brand experience and other key conversion metrics that matter for your brand.
Additionally, Google Tag Manager Comes with a host of additional benefits besides speeding up your website. You can head over here to understand all the key pain-points that GTM Server-Side Tagging can help you fix and the benefits of using GTM Server-Side Tagging.
If you would like to understand more about:
Google Tag Manager Server-Side Tagging and how it can impact your brand
Tracking and Measurement in the Cookie-less world now that third-party cookies will be killed entirely in 2023, you may download our free whitepaper here.
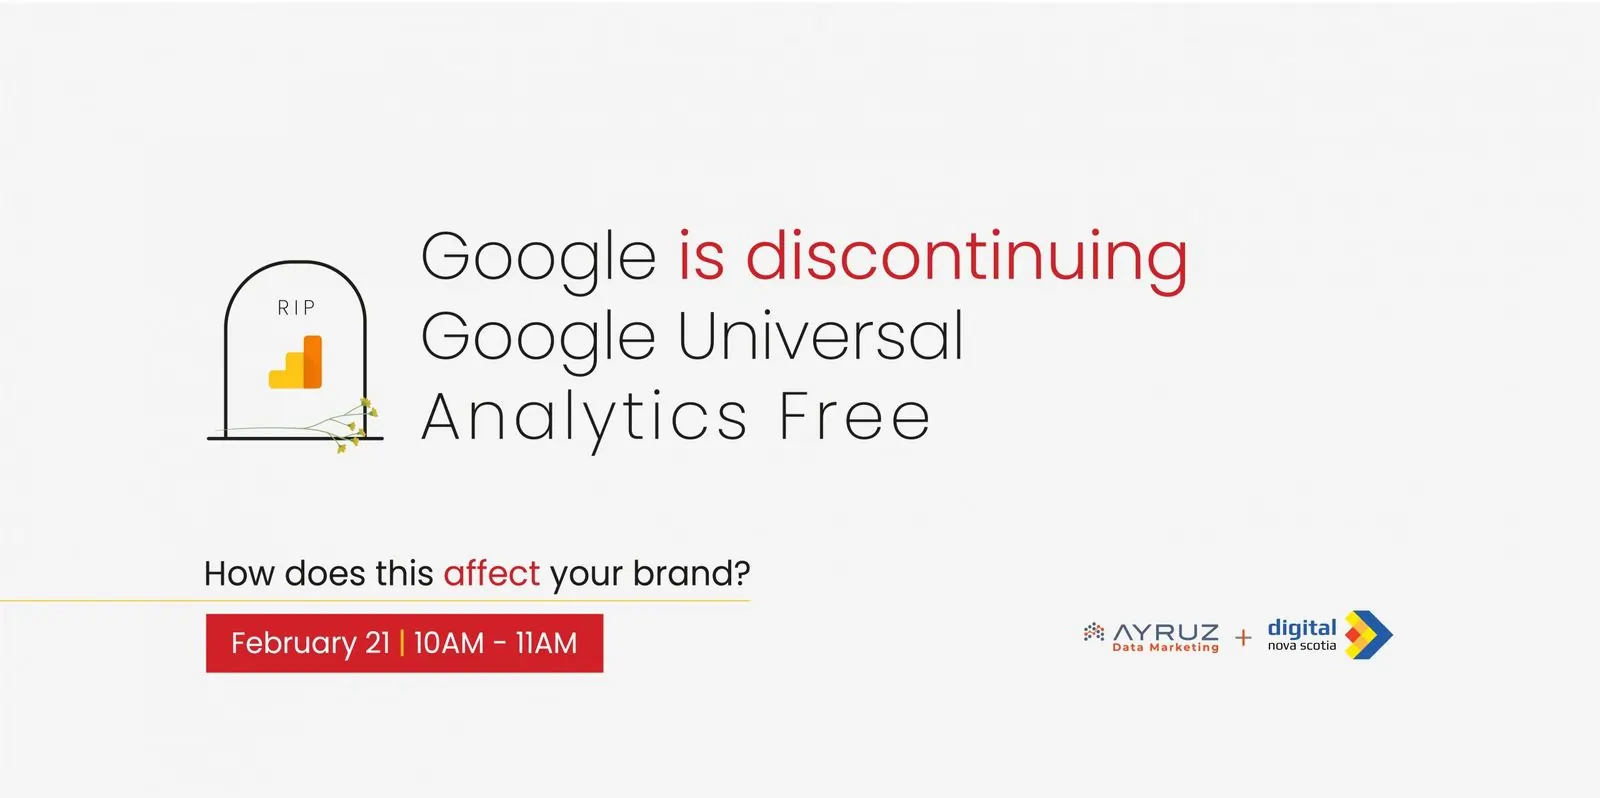
Without Google Universal Analytics, What’s Next: A Webinar by Ayruz and Digital Nova Scotia
As digital technology evolves, businesses need to stay ahead of the curve. That’s why Ayruz Data Marketing and Digital Nova Scotia are collaborating to bring you a valuable webinar on a topic that will impact many businesses soon: the end of the Google Universal Analytics Free version.
On June 1st, 2023, Google Universal Analytics Free version will no longer be available. This change will affect many businesses, websites, and apps, and it’s essential to understand the impact and find solutions. That’s where Ayruz Data Marketing and Digital Nova Scotia come in.
In this webinar, you’ll learn the following:
- How the end of the Google Universal Analytics Free version will affect your business, website, and app.
- The situation’s urgency and why it’s essential to solve the problem now.
- How Ayruz Data Marketing can help solve the problem and guide you through the process.
- The additional benefits of migrating to Google’s latest version of analytics.
With over 15 years of experience in digital analytics, Ayruz Data Marketing has helped a wide range of businesses, from startups to Fortune 500s. Our team of experts will bring their knowledge and expertise to the webinar to help you stay ahead of the game.
Ayruz Data Marketing is proud to collaborate with Digital Nova Scotia on this vital initiative. By working together, we aim to provide valuable insights and information to businesses in Nova Scotia and beyond.
Take advantage of this opportunity to learn about the end of the Google Universal Analytics Free version and how it will impact your business. Join Ayruz Data Marketing and Digital Nova Scotia for this informative and valuable webinar.
Register now to secure your spot! – https://members-digitalnovascotia.wildapricot.org/event-5141338
How to verify if GA4 is installed correctly?
GA4 is a helpful tool that provides valuable insights into website performance, user behavior, and marketing effectiveness. However, to ensure that you’re collecting accurate data and harnessing the full potential of GA4, it’s crucial to verify if it is installed correctly. This article will provide step-by-step guidance to ensure that GA4 is installed accurately. It is essential to have confidence in the data you collect. By testing and validating your GA4 implementation before it goes live, you can confidently track website performance, user engagement, and analyze user behavior while making informed decisions based on accurate analytics data.
1. Check for Tracking Code:
The first step is to confirm that the GA4 tracking code is implemented on your website. Next, locate the code snippet in your website’s HTML’s <head> section. Make sure to place the tracking code accurately on every website page.
2. Real-Time Data:
Utilize the Real-Time reporting feature in GA4 to verify the tracking functions properly. Access the Real-Time section in GA4 and perform actions on your website, such as visiting different pages, submitting forms, or triggering events. Monitor the real-time reports to see if the data is being captured accurately and in real-time.
Once you’ve published your Google Analytics 4 tags in Google Tag Manager, verifying that data is being collected from your visitors is advisable. This practice ensures that your GA4 implementation is functioning as intended and that you receive accurate data for analysis.
- To verify a GA4 property, login to your Google Analytics account and choose the property you want to verify.
- Go to Reports > Realtime (on the left sidebar).
- Open your website in a new browser window or tab.
- Check the “Real-time” report in your GA4 property to see if data is being collected.
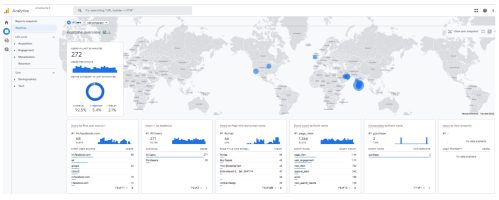
- Upon opening the dashboard, you’ll be presented with a map and several cards displaying information on traffic sources, top events, and the most important number of users active in the past 30 minutes.
- To view an individual user’s snapshot, click the “View user snapshot” button in the top right corner.
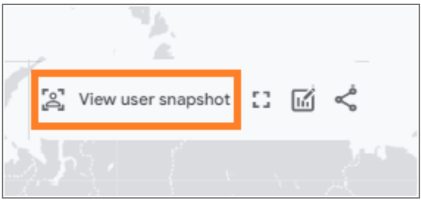
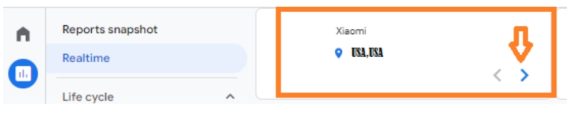
- Next, you’ll be able to view a stream of all events associated with a particular user, and you can click on individual events to view more detailed information, similar to using DebugView. Just click on the corresponding button to switch to another user or visitor.To close the snapshot, click on the Exit snapshot button in the interface’s top-right corner.
It’s important to see data in real-time reports. For example, if you expect visitors on your website or app but see no users in the real-time reports, something may need to be set up correctly.
3. Check Preview And Debug Mode:
This mode lets you simulate different scenarios and see how the data is collected and processed in real-time. Finally, the Preview mode creates a temporary version of your GA4 configuration that can be tested without affecting your production data.
a. Preview in Google Tag Manager
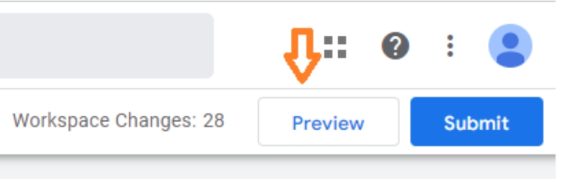
- Once you have installed GA4, In Google Tag Manager, click the Preview button in the top right corner.
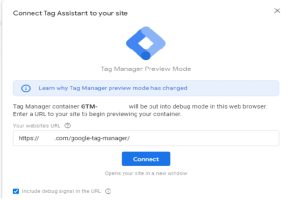
- A popup will appear requesting you to input the URL you wish to test and debug. This could be the homepage’s address or the URL of a particular page. Once entered, click on the connect button.
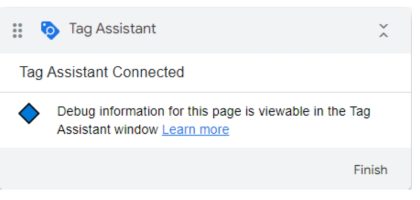
- After entering the URL in the previous pop-up, a fresh tab (or window) will open, displaying the same URL. You can view the badge mentioned below at the bottom of the newly opened tab/page.
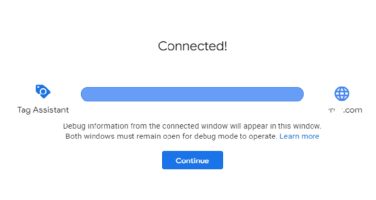
- If you go back to the “tagassistant.google.com“tab, you must see this success message.
- After turning on preview mode, click the event on the left side to check if your GA4 tag has been fired. If you set the tag to fire on all pages, click Container Loaded. You will see the tag is fired and check its status. You must get a successful message as shown in the reference image below.
b. DebugView in Google Analytics 4
Developers can use the DebugView report to watch events on a website or app from a browser or mobile device. This helps them to make sure they’re collecting data correctly when setting up events and event parameters.
- To enable debug mode on your devices, navigate to Admin > Properties > DebugView in the left navigation. You can monitor the triggered events from there using your website or app.
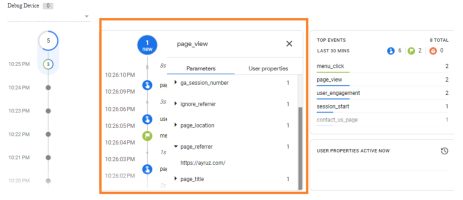
- When you use DebugView, you can view a stream of events. The Seconds stream (the middle column) shows the events logged in the last 60 seconds. The Minutes stream (the left column) shows a series of archives of events in the last 30 minutes. The right column shows the TopEvents logged in the 30 minutes and the user properties for the currently selected device. When you open the app, you’ll see a list of events logged in the last 60 seconds. Each event comes with a timestamp that shows when it was logged on the development device. You’ll see a list of associated parameters if you click on an event. As you use the app, events will continue appearing in the stream, with the newest ones at the top. This allows you to keep track of changes in user property values.
Refer to the image below:
- Parameter click on the parameter.
- Value of the parameter.
- While using the debug mode, it is necessary to filter out traffic to avoid any negative effect on the data collected for reports. By filtering out developer traffic, you can ensure that the data collected during the debug mode does not affect your report data.
Conclusion:
Verifying the accurate installation of GA4 is essential for obtaining reliable data and gaining meaningful insights into your website’s performance. This article provides clear steps to correctly implement GA4 and make informed decisions based on accurate analytics data. By following these steps, you can ensure a successful implementation.
How to find event parameters in GA4?
The GA4 is a highly effective analytics platform that offers useful information on how users interact with websites and mobile applications. One of its key features is the ability to track events, which are user interactions or actions you want to monitor. Understanding GA4 event parameters is crucial for gaining deeper insights into these actions and optimizing your tracking strategy. This article will explore the steps to find event parameters in GA4 and their significance.
There are different kinds of events that can be automatically collected or implemented in Google Analytics for your website or app:
Automatically collected events:
These events are collected automatically when you initially set up Google Analytics on your website or app.
Enhanced measurement events:
When you enable enhanced measurement in Google Analytics for your website or app, these events are collected along with the automatically collected events.
To view and analyze certain types of events in Analytics, you need to implement them specifically:
Recommended events:
These events have predefined names and parameters, and it is recommended that you implement them. You can access existing and future reporting capabilities in Analytics using these events.
Custom events:
These events are events that you define yourself. They should be created only when the predefined events do not suit your needs. Custom events may not appear in most standard reports, so you need to set up custom reports or explorations for meaningful analysis of these events.
Real-Time Event Collection in Analytics:
Ensuring Successful Collection of Events from Your Website or App.
Real-Time Report:
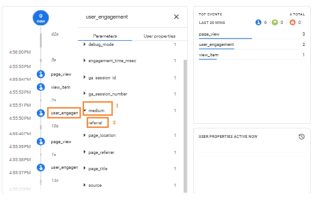
The Real-Time Report displays the number of times your website or app users have triggered each event within the last 30 minutes. You can see the specific event names and the corresponding count of triggers. In addition, you can view the parameters associated with an event by clicking on an event.
Debug View Report:
The Debug View Report allows you to see all the events a single user triggers. This report helps confirm if you have correctly set up an event and its parameters. Before using this report, you need to enable debug mode.
How Does GA4 Track Event Parameters?
In Google Analytics, you can send events with additional details called parameters. Parameters provide extra information about the event. For instance, when the “page_view” event is sent to your reports, it includes parameters like “page_location” and “page_referrer” The “page_location” parameter shows the URL of the page someone viewed, while the “page_referrer” parameter shows the URL of the previous page they visited. Here’s an example of how a “page_view” event appears in Google Analytics, along with its parameters. In addition, Google Analytics will automatically send parameters with each event. These can include:
- The ga_session_id parameter includes the unique identifier assigned by Google Analytics for the user’s session.
- The page_location parameter sends the URL of the page currently being viewed.
- The page_title parameter sends the title of the page currently being viewed.
- The page_referrer parameter sends the URL that someone viewed before the current page. This can include other pages on your website or third-party websites (if someone clicked through to your website from another website).
For events automatically tracked by Google Analytics, additional parameters are also sent.
Automatic Events in Google Analytics 4:
Once you include the Google Analytics 4 tag on your website, it will automatically monitor various events whenever someone visits a page. As an illustration, Google Analytics will automatically track an event when a person spends a minimum of 10 seconds on your website. Events tracked automatically include:
| Event Name | Description |
|---|---|
| Page View | Tracked when a user visits a specific page on your website or app. |
| Screen View | Recorded when a user navigates to a specific screen in your mobile app. |
| Event | Captures various predefined events such as button clicks or form submissions. |
| Ecommerce | Tracks transaction-related events, including purchases and product interactions. |
| User Timing | Measures the time taken for specific user actions or processes. |
| Social Interaction | Captures interactions with social media buttons or shares. |
| Exception | Records errors or exceptions encountered during user interactions. |
| Ad Click | Captures user clicks on advertisements displayed on your website or app. |
| Ad Conversion | Records when a user completes a goal or conversion related to an advertisement. |
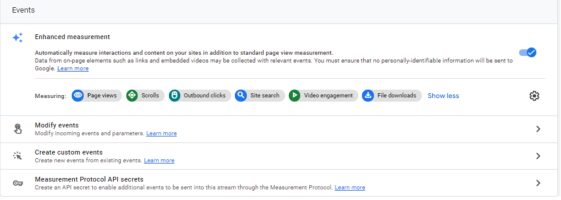
Enhanced event measurement:
Enhanced measurement lets you track user interactions with your content by activating events within the Google Analytics interface. Again, no coding is necessary for this setup. Once you enable these options for a web data stream, your Google Analytics tag will immediately start sending events.
To enable or disable enhanced event measurement in Google Analytics, follow these steps:
Ensure that you are in the correct account and property. (Refer to the image below)
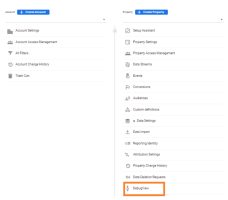
- Open Google Analytics and click on “Admin.”
- Click “Data Streams” in the Property column and select “Web.”
- Look for the “Enhanced measurement” section and slide the switch to the “On” position to enable all available options.
- Click “Settings” to customize individual options per your requirements if needed.
- You can also turn off specific measurement options in settings.
Here’s an example table showcasing different types of measurement events in Google Analytics 4 (GA4):
| Event Name | Description |
|---|---|
| Page View | Tracked when a user visits a specific page on your website or app. |
| Scroll | Captures when a user scrolls through a webpage or app screen. |
| Click | Records user clicks on specific elements like buttons or links. |
| Video Start | Triggered when a user starts playing a video on your website or app. |
| Video Complete | Captures when a user finishes watching a video. |
| Form Submit | Tracks when a user submits a form on your website or app. |
| Purchase | Recorded when a user completes a purchase transaction. |
| App Open | Tracked when a user opens your mobile app. |
| App Update | Captures a user update your mobile app. |
| Error | Trigger when an error occurs on your mobile app. |
Recommended events:
Adding these events to your website or mobile app allows you to measure more features and user behavior, resulting in more useful reports. However, these events are not sent automatically because they need additional information to be meaningful.
Here are some examples of recommended events in Google Analytics 4 (GA4), categorized by different aspects:
E-commerce Events:
| Event Name | Description |
|---|---|
| view_item | Tracked when a user views a specific item in your online store. |
| add_to_cart | Recorded when a user adds an item to the shopping cart. |
| remove_from_cart | Captures when a user removes an item from the shopping cart. |
| begin_checkout | Tracks when a user initiates the checkout process. |
| purchase | Captures when a user completes a purchase transaction. |
| refund | Recorded when a user requests a refund for a purchase. |
| view_promotion | Tracked when a user views a promotional offer or discount. |
| select_promotion | Captures when a user selects a specific promotion or coupon. |
Content Engagement Events:
| Event Name | Description |
|---|---|
| Page_view | Tracked when a user views a specific page on your website or app. |
| Scroll | Captures when a user scrolls through a webpage or app screen. |
| video_start | Recorded when a user starts playing a video on your website or app. |
| video_complete | Tracked when a user finishes watching a video. |
| search | Captures when a user performs a search on your website or app. |
| share | Recorded when a user requests a refund for a purchase. |
| comment | Tracked when a user leaves a comment on your website or app. |
| rating | Captures when a user rates or reviews a product or content. |
Conversion and Lead Generation Events:
| Event Name | Description |
|---|---|
| sign_up | Tracked when a user signs up or creates an account. |
| login | Captures when a user logs in to their account. |
| submit_lead | Recorded when a user submits their information for lead generation. |
| begin_checkout | Tracked when a user initiates the checkout process. |
| add_payment_info | Captures when a user adds payment information during checkout. |
| subscribe | Recorded when a user subscribes to a service or newsletter. |
| complete_registration | Tracked when a user completes the registration process. |
Custom Events in Google Analytics 4:
Custom events in Google Analytics 4 (GA4) are events that you define based on your specific tracking needs. Unlike predefined events, custom events allow you to track and measure unique interactions or actions specific to your website or app. For example, you can define custom events to capture user behavior, conversions, engagement, or any other meaningful actions relevant to your analytics goals. Make sure the name of the custom event is not a reserved name.
By defining and implementing custom events, you can gain deeper insights into user behavior, evaluate the success of specific actions or campaigns, and tailor your analytics tracking to align with your unique business requirements.
Here are some examples of custom events in GA4:
- Video_play: Tracks when a user starts playing a video on your website or app.
- Newsletter_subscribe: Captures when a user subscribes to your newsletter.
- Contact_form_submit: Recorded when a user submits a contact form on your website.
- Add_to_wishlist: Tracked when a user adds a product to their wishlist.
How to setup custom event in GA4:
Tag Manager: Using Google Tag Manager, you can create custom events by creating a new tag and configuring it to fire when a specific action or event occurs on your website or app. This lets you track custom events without modifying the website’s code directly.
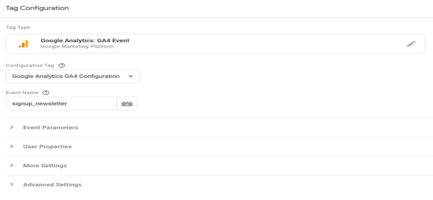
Step 1: Create a GA4 Event tag to begin
Generate a Google Analytics: GA4 Event tag specifically for the custom event you wish to track.
- In Google Tag Manager, access the Tags section by clicking on the Tags icon (depicted as an image).
- Choose the “New” option. Provide a name for the GA4 Event tag (e.g., “GA4 Event – Signup newsletter”).
- Select “Google Analytics: GA4 Event from the available options.
- Choose the appropriate Google Analytics: GA4 Configuration tag within the Configuration Tag.>
- Enter a name for the event in the Event Name field (e.g., signup_newsletter).
This will establish a new custom event; its designated name will be visible in your GA4 reports.
Step 2: Create a trigger to send the event when someone clicks the button.
Select the Triggering option within your GA4 Event tag.
- Click +on the top right.
- Enter a name for the trigger (e.g., “Trigger – Signup newsletter”).
You have the flexibility to specify the conditions for triggering the event. The event is sent based on the button label in this particular example.
- Click the Trigger Configuration box in your trigger.
- Choose All Elements./li>
- Click Some Clicks.
- Set the trigger condition: “Click Text contains Sign up for the newsletter”.
- If you don’t see Click Text, click the first drop-down and select Choose Built-In Variable. From the menu, select Click Text.
- Save all your changes.
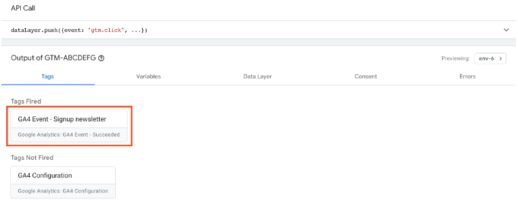
Step 3: Before publishing your new event in Tag Manager, click Preview to see the data recorded when you click the “Sign up for the newsletter” button. When you are ready to publish your changes, click Submit.
GA4 Event Reports: Analyzing Event Data in Google Analytics 4:
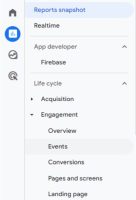
To access event reports in GA4, follow these steps:
- Go to your GA4 property.
- Click on the “Reports” tab to enter the reporting section.
- Within the reporting interface, find and select the “Engagement” category.
- Look for the “Events” option and click on it to access the event reports.
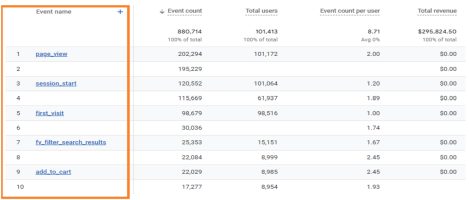
In the GA4 reporting view, you can view a comprehensive list of all your logged events.
You can find out how many times each logged event was triggered.
Limitation of setting up events in GA4:
There are some limitations when working with events in Google Analytics 4 (GA4). Here are a few key limitations:
- Maximum Event Parameters:GA4 allows up to 25 event parameters per event. Each parameter can have a maximum of 100 characters for the name and 500 characters for the value.
- Maximum Event Names: GA4 supports up to 500 unique event names per property. It’s important to choose event names that are descriptive and meaningful to avoid exceeding this limit. In Google Analytics 4 (GA4), the maximum length for an event name is 40 characters.
- Data Sampling: In cases with high events, GA4 may use data sampling to process and analyze the data. This can result in aggregated or sampled data being used for reporting, which may not accurately represent the complete dataset.
- Data Retention: GA4 has a default data retention period of 14 months. This means that event data older than 14 months may be automatically deleted and no longer accessible in GA4 reports.
It’s important to be aware of these limitations when planning and implementing event tracking in GA4. Understanding these boundaries can help ensure accurate and effective data collection and analysis within the available constraints.
Conclusion:
Setting up events in Google Analytics, including GA4 migration services, is a crucial step in gaining valuable insights into user behaviour and measuring the effectiveness of your digital initiatives. Whether you opt for automatically collected events or define custom events, tracking specific interactions or actions, including GA4 migration services, provides you with a deeper understanding of how users engage with your website or app. You can monitor important metrics by setting up events, such as button clicks, form submissions, video views, social media engagement, and GA4 migration services. This data empowers you to make informed decisions, optimize your digital strategies, and improve the user experience, including GA4 migration.
How to Connect GA4 Data to a Looker Studio Dashboard
In today’s data-driven world, businesses rely on powerful analytics tools to gain insights and make informed decisions. For example, Google Analytics 4 (GA4) is a tool that helps organizations track and analyze user behavior on their websites and applications. On the other hand, Looker Studio is a powerful data exploration and visualization platform that enables users to create interactive dashboards and reports. This article will explore how to connect GA4 data to a Looker Studio dashboard and highlight the key advantages of using Looker Studio.
How to Connect GA4 to Looker Studio
Step 1: Set up Google Analytics 4: Before connecting GA4 data to Looker Studio, you must correctly set up your Google Analytics 4 property. This involves creating a GA4 property in your Google Analytics account and implementing the necessary tracking code on your website or application. Once your GA4 property is running, you can start collecting data.

Once you have logged in, you will see a screen that looks like this
Step 2: Connect GA4 to Looker: To connect GA4 data to Looker Studio, you will need to follow these steps:
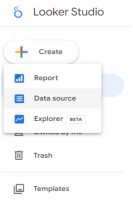
- Open Looker Studio and navigate to the “Data Source”
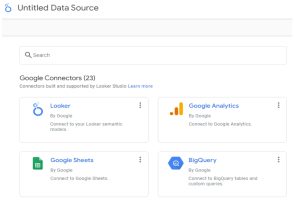
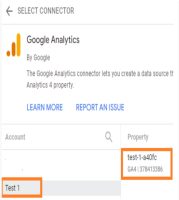
2. Select “Google Analytics 4” as the Google Connectior type.
3. Select the desired GA4 property from the list of available properties.
4. Configure the connection settings, such as the date range and other filters, to define the data you want to import into Looker Studio.
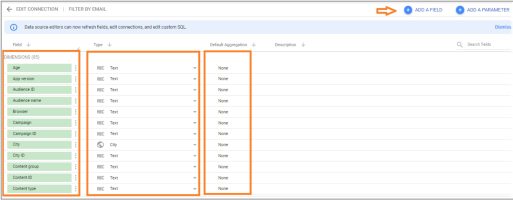
- Save the connection and proceed to the next step.
Step 3: Build a Looker Studio Dashboard: Once the GA4 connection is established, you can build a Looker Studio dashboard to visualize and analyze your GA4 data. Looker Studio’s drag-and-drop interface allows you to create interactive and dynamic dashboards effortlessly. As a user, you can choose from various visualization options, such as charts, tables, and maps. This will enable you to present your data clearly and meaningfully.
Key Advantages of Looker Studio
- User-Friendly Interface: Looker Studio offers an intuitive and user-friendly interface, making it easy for technical and non-technical users to create and explore data dashboards. The drag-and-drop functionality simplifies the process of building visualizations, reducing the need for complex coding or scripting.
- Real-Time Data Insights: Looker Studio lets you connect to various real-time data sources, including GA4. This means you can access the latest data and gain insights into user behavior and website performance. Real-time data updates enable you to make timely and informed decisions.
- Interactive Dashboards: With Looker Studio, you can create interactive dashboards that enable users to explore data and ask ad-hoc questions. Users can drill down into specific metrics, apply filters, and change visualization options on the fly, empowering them to find answers to their specific queries.
- Collaboration and Sharing: Looker Studio facilitates collaboration among team members by providing easy sharing options. You can share dashboards, reports, and visualizations with colleagues or stakeholders, allowing them to access and interact with the data. Looker Studio also offers robust security and access controls to ensure data privacy.
- Scalability and Customization: Looker Studio is highly scalable and can handle large volumes of data. It offers customization options that allow you to tailor your dashboards to meet your specific business requirements. You can create custom calculations, implement business rules, and even embed Looker Studio dashboards into other applications or websites.
Limitations of Data Studio:
- Real-Time Reporting: Real-time reporting in GA4 is not currently supported in Data Studio. You can still access real-time data in the GA4 interface, but it’s not available for direct integration into Data Studio dashboards.
- Data Freshness: Data Studio relies on the Google Analytics API to fetch data, and there might be a slight delay in data freshness compared to the real-time data available in GA4. The data may take some time to propagate and become available for visualization in Data Studio.
- Lack of Customization: While Data Studio offers a wide range of visualizations and customization options, it may have limitations when fine-tuning certain elements’ appearance and functionality.
Conclusion: Connecting GA4 data to Looker Studio allows for analyzing and visualizing your website or application performance during the GA4 migration process. In this article, we will guide you on easily connecting and using Looker Studio’s interactive dashboards to gain valuable insights from your GA4 data. Follow the outlined steps to seamlessly integrate GA4 data into Looker Studio. With its user-friendly interface, real-time data updates, and collaboration features, Looker Studio empowers businesses to make data-driven decisions and drive success throughout the GA4 migration journey.